|


|

 |
|
Sunday, December 10, 2005 - I spent a good
portion of the day today getting started on repairs necessary to
the box. However, before I get ahead of myself, I should get you
up-to-date.
I
saw an auction on E-bay back in mid-August for a '72 SWB truck.
Here's a copy of the listing: |
|
1972 Ford 1/2 ton Short Box Pickup with Cap
This is my neighbors truck and I'm listing it for him. It has a
later Ford V-8 in it and a 3 speed floor shift. I believe it's a
302 motor. I just started it and drove it around and it starts
and runs fine but probably could use a tune up. Shifter is OK
and the clutch seems to work good. You need to give it a bit of
gas when you first take off but maybe that's characteristic. I'm
used to driving a 460 Ford and it just jumps when I take off!.
The
body on this little truck is surprisingly rust free especially
for a midwestern truck. The inner fenders where the hood
attaches looks solid and hood opens and closes fine. The
interior is nice and the bed is solid. It has an aluminum cap on
it that has a little damage at the top and a few dings but still
works good. Most everything that I see looks nice for a 33 year
old truck.
I'm
listing this as a parts truck simply because it has been sitting
for a while. Even though I started it and drove it about 50
yards I'd want to check things out, tune it up and so forth
before I hit the road with it. Or if you just need a nice cab,
fenders, doors, interior and so forth this would be perfect.
Take what you need and sell the rest. It does have a near new
Interstate battery in it.
It
should be considered as a parts vehicle only and you may want to
trailer it home. Or I can haul it for you if needed - BUT we
need to discuss this before the auction closes. I'm very busy
hauling vehicles right now so don't assume anything until you
talk with me. It may be OK to drive it a ways but I'd prefer to
trailer it so I don't have any surprises along the way. I guess
that's just the way I do it whenever I buy a car or truck. You
can do whatever you are comfortable with. |
PICTURES POSTED WITH THE AUCTION
Fig. 1
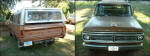
Fig. 2

Fig. 3 |
|
Since I'd been keeping my eyes and ears open for a decent box
for my truck, because of the rust repair that was going to be
necessary on my original '67 box, I went ahead and gave the guy
a call. He lives about 4 hours away, so I figured it might be
do-able. I started off by explaining up-front that I wasn't
really looking for an entire truck but needed a good box. While
he was on the phone he walked around the truck and described the
box to me, even crawling up underneath. Besides surface rust,
the only thing he said he could find on the box was a little bit
up along the front panel on top. He then told me that he had a
'68 that really needed a good cab and front sheetmetal, and if I
was only interested in the box, we might be able to make a deal
on splitting the cost of the truck. The owner would get what he
wanted and so would each of us. I told him I'd think about it.
In the meantime, he posted the following update to his auction
listing: |
|
In
response to MANY questions, I just crawled around under this
truck to take a real close look. Remember this is not my truck.
Anyway, the underside is really very nice. This a single beam
front axle and it all looks good. I didn't see a bunch of oil or
leaks or anything hanging down. Looks like whoever put the 302
in this did a nice job. Now to the cab. The cab has had some
floor repair on each side where you would place your feet.
Panels where cut and fit and put in and they appear to be
galvanized sheet metal. Pretty solid repair but the old sheet
metal is still underneath. Carpeted and the mats are in place.
The rockers look fine but there is some repair needed at each
front cab mount. They're solidly attached but there is some rust
through and you may want to fix them. The cab does not droop or
anything though as the supports are still doing the job. At the
bottom of the driver side door there is a small amount of rust
coming through on the outer skin (couple of inches in length)
and there is a small spot of rust at the rear bottom edge of the
door jamb. Both cab corners have a bit of rust in them and I'd
probably rebuild or replace them if I were gonna restore this
cab, but as a driver it won't hurt a thing. All of the bed
mounts are nice and solid! Not bent. I didn't see any rust
through on any of the cross supports either and they all appear
straight. There is some rust through at the very bottom of the
tailgate however but none on the rear of the box itself. It has
a dual exhaust under it that looks good all the way back and it
turns out behind the rear diff. Glass all looks good. All in all
this is a nice little truck especially for being well over 30!
If you expect a new truck then buy a new truck. If you want a
nice little truck for parts or to fix up and have fun with, then
this may well be what you need. Good luck with the bids and I
hope this has answered most all of the questions so far. My
neighbor has a local price on this and you are welcome to email
for more info. |
|
After giving it some thought, based on his description, I
decided to go ahead and buy it. We talked again on the phone and
we agreed that he'd end the auction early when he received a
payment of $500 for the box and rolling chassis, and he'd meet
the $850 reserve set by the owner. He'd then remove the front
sheetmetal and cab for his truck, and would bring me everything
else. I'd also pay him $100 for fuel reimbursement for him to
haul it here to me. He told me it would take a couple weeks to
get disassembled and delivered, and I said OK. We decided to
shoot for Memorial Day weekend for delivery.
As
Memorial Day weekend approached, we talked on the phone and he
said he hadn't gotten a chance to get started yet, and it would
be a couple more weeks. From that time on, I called him every
2-3 weeks to see how it was going, and kept getting told that it
would be a couple more weeks. Anyway, to make a long story
short, he finally called me on Nov. 5th, saying he was on his
way. It was a good thing he called when he did, because we were
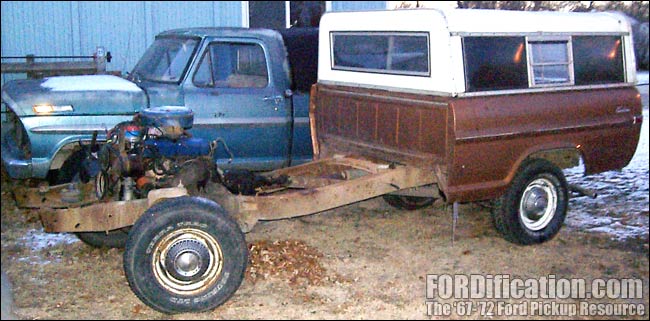
set to leave on a 2-week vacation that evening. He rolled into
town about mid-afternoon and we unloaded the truck at the shop.
However, to be honest, I was a little disappointed by what I
saw, but I was due to leave on vacation in a few hours and
didn't even really have time to give it a good going-over. When
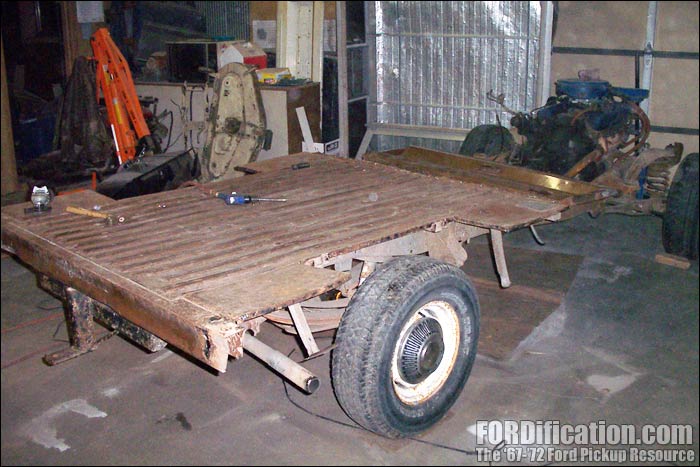
I returned two weeks later I shot the following pictures: |
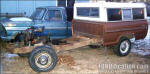
Fig.
4 |

Fig.
5 |

Fig.
6 |

Fig.
7 |
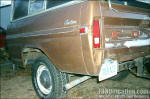
Fig. 8 |

Fig.
9 |
|
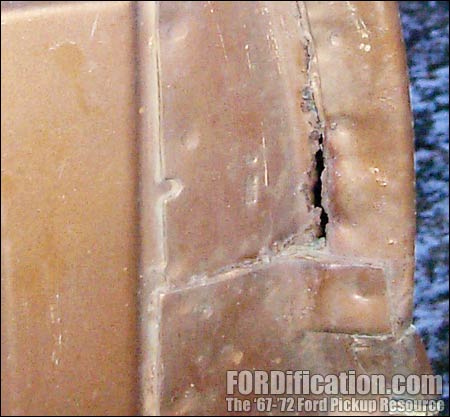
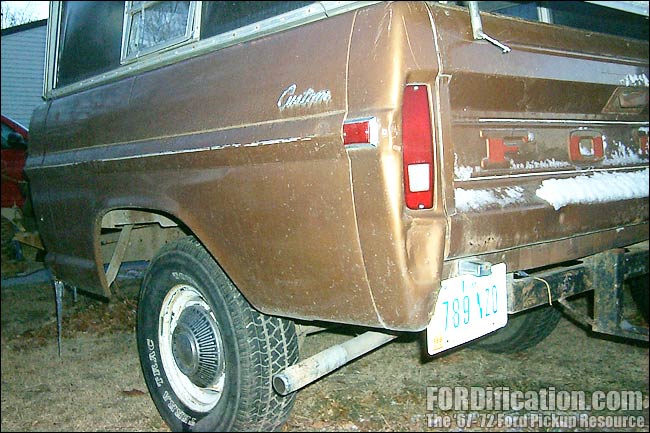
At
first glance it doesn't appear too bad. However, once you start
looking at it more closely, it's not in the best shape. As you
can see, Figs. 5 and 6 show the rusty areas on the front end
panel that he mentioned on the phone. I wasn't too worried about
these areas, as I could easily cut these out and weld in patch
panels, and since it was in a hidden area behind the cab, they'd
be virtually invisible. However, rust had gotten into the body
seam on both sides, and upon closer scrutiny (Fig. 7) I could
see thick body filler on the right side along the seam, and
could only imagine how bad it was. The left side end-cap was
banged up and virtually non-repairable. And finally, the front
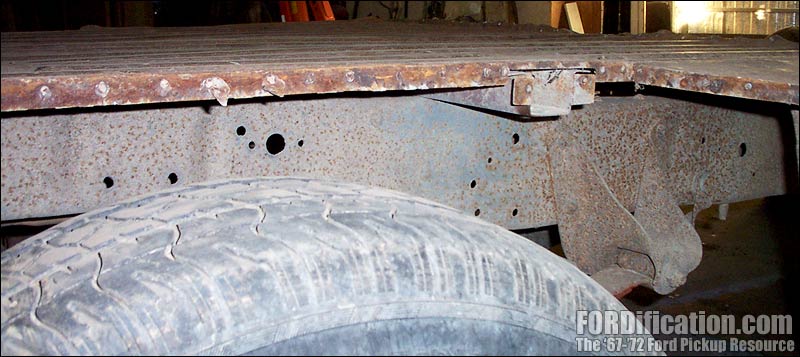
bed-floor support was completely rusted out, both on the bottom
and the sides (Fig. 9). At first glance the bed floor itself
appeared to be in good shape, as well as the remainder of the
underbed floor support channels.
So
at this point I started contemplating what I was going to do. I
have the original '67 box which has some major rust damage
underneath, and now a '72 box which appeared to be good
underneath (aside from one floor support) but had pretty good
damage on the side and end panels. So what to do? I've spent the
past several weeks going over this in my mind, trying to figure
out what to do. Should I just sell the rolling chassis and try
to recoup my investment and keep my eyes open for another box?
Should I just try to repair one or the other, or use one as a
patch-panel donor to fix the other?
Well, today I finally decided that since the purchase of this
'72 pretty much depleted my truck funds account and I was
getting antsy about getting more done on this project, I'd just
bite the bullet and completely disassemble both boxes and then
reassemble it using the best pieces from both beds. It was going
to be a LOT of work, but as you can probably tell by now, I'm
not afraid of diving in and getting my hands dirty, as long as I
can see regular progress. The '72 bed will supply the floorpan
and supports, while the '67 bed will give up it's side and front
panels, as well as the end posts and wheelwells.
|
|
So I
rolled the '72 chassis into the shop and to get started with the
disassembly. Since every individual panel is spot-welded
together, I would need to invest in a spot-weld drill bit and so
I hit both local auto parts stores searching for one. The first
place I went to had a guy at the counter who hadn't even heard
of such a thing before. He did some poking around in his
catalogs and didn't see anything listed. I hit the second store
and found that they did have one, but a cheapie version ($9)
(Fig. 10). I'd never seen one like it before, and I had my
doubts whether it would work, but decided to pick it up and give
it a try. Unfortunately, the cutting points on this bit wore out
before I'd even completed drilling out the first spot-weld.
|
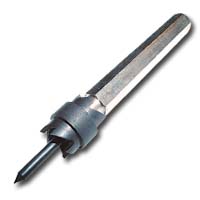
Fig. 10
|
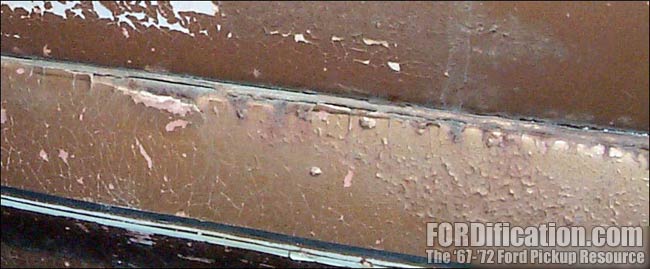
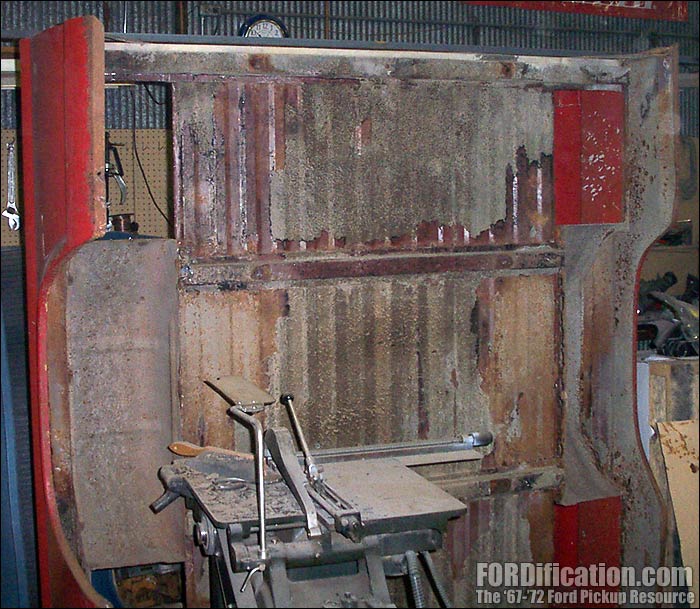
|
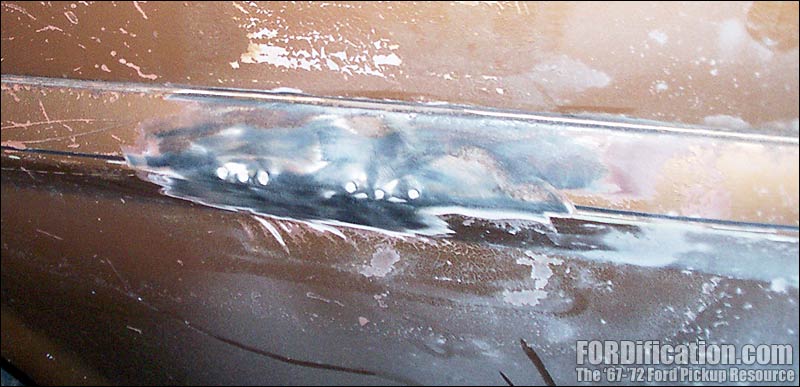
Fig. 11 - After hitting the Bondo'd area on the right side
with a wire wheel, I could see that a previous owner had tried
to repair the ridge by drilling holes to pull out a dent, and
then just slathered 1/4" of filler in there. |
 |
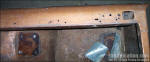
Fig.
12 - The bed evidentially had a rollbar installed at some point.
The previous owner decided to fix this by drilling four NEW
holes to attach aluminum covers, and used a half-tube of silicon
to seal it up. In addition, the tops of both side panels each
had a large collection of holes that would have needed welded
up. |
|
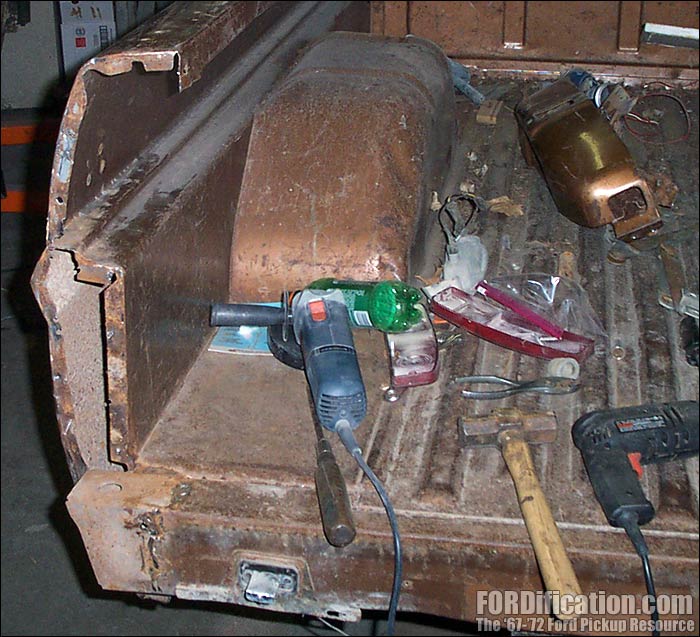
So I
decided to just dig out the air chisel and see how that would
work. I decided that the '72 box would supply the floorpan and
supports, and I'd have to remove one support from the '67 bed to
replace the rusted piece shown above in Fig. 9. Therefore,
everything above the bed floor was fair game to practice with
the air chisel. While it was slow going, it was working,
although it was difficult to keep the chisel from occasionally
cutting through something it wasn't supposed to. I started off
by removing the left-side end cap (Fig. 13). I can see now that
this is something that would have been impossible to do by
drilling out the spot welds, due to their being completely
inaccessible with a drill. I'm not sure how it could have been
done by the factory! Then, because the lower side panels were
dented up and rusted-out along the seam, I just used the air
chisel to break what little bit of spot-weld remained to hold
them on. (This really wasn't necessary for what I had planned,
but I just wanted to get an idea of what it would take to remove
one.) The front lip of the lower panel is also spot-welded along
the front of the bed and would have required drilling out those
welds, but since I was discarding all this anyway, I just dug
out the angle grinder with a cut-off wheel in it and cut the
panel off.
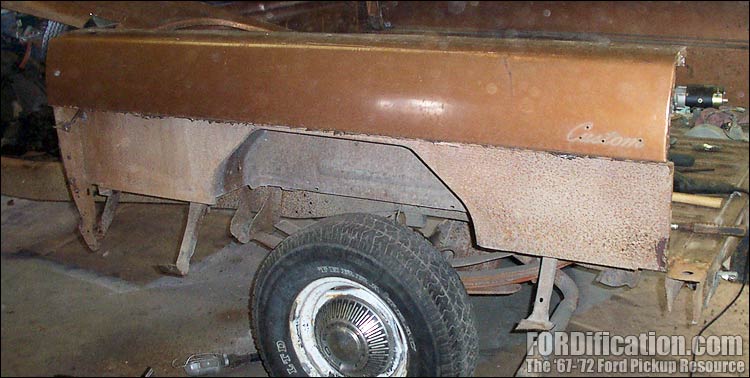
I
then got started removing the main box sides. I discovered that
a BFH (big freakin' hammer) made short work of removing the
sides and wheelwells from the bed floor (Fig. 15) and saved me a
lot of time. There were still a few stubborn spot-welds which
required either the cut-off tool or the air chisel, however, but
this actually went pretty fast.
In
Fig. 16 you can see the bed side and wheelwell almost completely
taken off. It was still connected at the front of the box in
this photo, but it wasn't necessary to remove it further, since
I was also planning on removing the front panel from the
floorpan section. Once this photo was taken, I got started on
the right side and removed it in the same way. The front
floorpan support (on the bottom of the bed - Fig. 9 above) has a
lip which wraps up around the bottom of the bed's front panel,
so I did have to fire up the air chisel again to cut those spot
welds.
Fig.
17 shows the finished product...the floorpan section after the
front and side panels were removed. This whole process took me a
good 4 hours or so. You can also see that I kept the four
side-panel lower supports (hanging down on each corner), by just
using the cut-off tool and cutting away a small section of the
lower fender. I'll clean these up and reuse them as
well...although I might just leave the small pieces of metal on
the ends of the supports and weld them onto the new lower panels
as-is, for extra support.
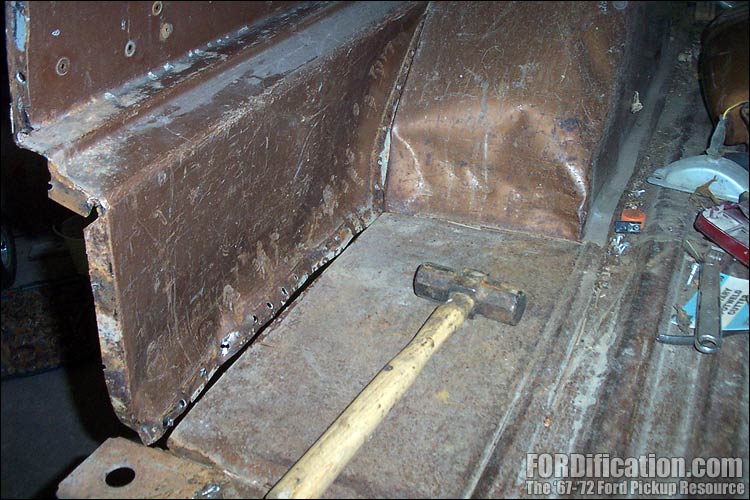
I
then got out the grinder and cleaned up the edges all the way
around the floorpan's perimeter (Fig. 18), and used a block of
wood and a hammer to straighten out all the lips, where the new
side-panels would need to be welded.
In
Fig. 19 you can see the lip for the front floorpan support is
bent up. As mentioned above, it wraps up around the front of the
bed and is spot-welded to the bed's front panel. Once I get some
good spot-weld drill bits, I'll flip the floorpan section over
and drill out the welds holding the rusty front support to the
floorpan and replace it with a good one from my '67 box.
I
then got started with some of the disassembly of my '67 box. In
the last picture (Fig. 20) you can see that the floorpan area
has been cut from top to bottom with the air chisel. leaving
about 1/4" of metal on it which will be cleaned off later.
However, I figured it was better to have it and not need it than
need it and not have it. I've gotten about as far on this box as
I can until I get some good spot-weld drill bits for further
disassembly.
I
believe I can just drill out the spot-welds holding the front
floorpan support to the floorpan...and by leaving the front
support attached to the side panels at both ends, I should be
able to just hook it up under the front of the '72's floorpans,
set the rest down on top of the floorpans and weld it back up. I
guess we'll see when I make it to that point. |

Fig. 13 - I started out by removing the end cap.
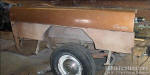
Fig. 14 - Here's a shot after removing the lower side
panel.

Fig. 15 - I loved getting Neanderthal with the BFH!

Fig. 16 - A view of the box sides almost completely
removed.

Fig. 17 - ...and here's the finished product.
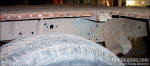
Fig. 18 - In this close-up you can see the broken spot
welds that I would have to grind down.
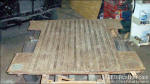
Fig. 19 - A view from the front.
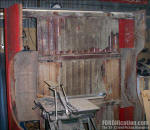
Fig. 20 - Here's a shot of my original '67 bed, with most of the
necessary cuts made to remove the floorpan section. |
|
So
this is basically where I'm at right now. Although I'll actually
have both days next weekend to spend in the shop working on
this, I doubt I'll be able to get any more done on it, since I'm
going to have to special-order the spot-weld drill bits, and I
doubt I'd get them in time. However, I AM going to try. If it
doesn't happen, I'm sure I'll find something else to do to keep
me busy in there. I mean, I have to take advantage of the
opportunity! How often does a married guy with three kids
actually get a whole weekend to himself to play in the shop?
Stay tuned! |
|
 |

Want to link to
this site? Please save this banner to your hard drive to place on your
webpage.
The correct link to use is
http://www.fordification.com
|