|


|

|
|
|
Installing Disc Brakes on Your 2WD Pickup |
|
 |
|
KINGPIN REMOVAL
If you're planning on
dropping off the axles, kingpins and spindles off at the machine shop
(the recommended route),
you can skip ahead to the Reassembly &
Reinstallation section right now. However, if you're a masochist
and want to save the money and do this all yourself, keep reading on....
So...you're going to tackle the job of kingpin removal and replacement
on your own. Well, be prepared to use a BIG hammer (aka BFH) and lots of heat (and
more than a few loud four-letter words!) if you (or the previous owner) neglected to keep his front end properly
lubed.
|

Fig. 1 - The kingpin bushings are located
in the spindle only.

Fig. 2 - Here are all the old
front-end parts: kingpins and retaining pins and bushings, axle
pivot bushings, grease caps and shims.

Fig. 3 - Here's the freshly removed spindle.

Fig. 4 - Be sure to replace
the axle pivot bushings while everything's easily accessible. |
Start off by cleaning the whole kingpin region as much as possible, and
then start by removing the kingpin's tapered locking pin. You'll remove
a nut and then drive the pin out of the I-beam. Then remove the top and
bottom grease caps to expose the ends of the kingpin. Wipe as much of
the old grease out as possible. Since the kingpin
is just a straight pin, it can either be driven out the top or the
bottom. Be sure to wear safety glasses, as the kingpin is a hardened
steel shaft and therefore brittle, and it's always possible for a
misaligned hit to cause a chip to go flying.
If the front end was properly lubricated during it's life, the
kingpin should come out fairly easily after the first couple of good
hard whacks, but most people say that it takes a lot of pounding to get
them moving. Once they do start moving it usually gets a little easier.
The use of a brass drift with a slightly smaller outside diameter than
the kingpin is highly recommended. Using a steel drift can also booger
up the threads in the spindle necessary for securing the end caps. Just
be careful to not mushroom the end of the kingpin, as further removal
will be next to impossible! One nifty trick is to remove the upper
grease cap and drill a 1/2" hole in the center of it, and then
reinstall. You can then use a 1/2" drift to drive out the kingpin, with
the grease cap acting as a guide to keep things centered and to protect
the grease cap's threads in the spindle. And don't worry...your kingpin
set comes with new grease caps.
If your kingpins don't budge at first, you can start applying heat to the axle
(not the spindle), being careful not to get it cherry-hot which could
affect the temper of the steel, and attempt to drive the kingpin out
using your BFH. You might find you'll have to break out the Liquid Wrench
or PB Blaster and soak the heck out of everything and just let it set for a day or so before trying
it again.
Once the kingpins are out, start by cleaning up the kingpin bore
in the axle using some emery cloth. (Do NOT use a brake hone!) Don't get
carried away here...you just want to clean it up. Once you can lightly
tap the kingpin into this hole with just a little resistance, stop!
Repeat this process with the spindles' kingpin bores.
Now you're ready to install the kingpin bushings. If you're using the
plastic bushings, you should be able to tap them into the spindle using
a block of wood. The bronze bushings will need to be pressed in and
reamed to fit the kingpin and is a job best left for the machine shop. A
brake hone will not get the job done, as the upper and lower bushings
need to be done together at the same time. This is a fast and cheap job
that you shouldn't attempt yourself without the proper equipment.
Next, you need to
replace the axle pivot bushings. These are pressed into the axle but can
be done at home if you have access to a hydraulic press. Considering how
very cheap the bushings are, replacing them should be done regardless of the old bushing's
condition. Might as well do it now while it's easy access, right? I
replaced my stock rubber bushings with PST's polygraphite bushings which
required the use of the original outer shells. Since the machine shop
messed up the shells of the original bushings when they were being
removed, and considering new bushings were extremely inexpensive, I
opted for buying a new set and drilling out the rubber portion and then
just pressed the new shells back into the I-beam.
Once the kingpin bushings are pressed in and reamed and the axle pivot
bushings are installed, you can begin the actual reassembly...

|
|
REASSEMBLY & INSTALLATION
Begin by installing the new kingpin, bearing, seals and shims. The
bearing should be marked for proper orientation. Be sure to line up the
notch in the kingpin with hole in the axle end for the tapered securing
pin...(Incidentally, the bearing goes under the axle, and the shims, if
needed, go on top of it) and then install the securing pin. Install the
grease caps and lube the assembly. You're now ready to install the I-beam
assemblies back onto the truck.
Incidentally, this is a
great time to install new radius arm bushings...considering how cheap
they are, it would be senseless to reuse your old ones. Slide the radius
arms onto the I-beams and insert the coil spring bolt (Fig. 5). Slide
one of the radius arm bushings and washers on each arm and then lift each
assembly back up into place with a hydraulic jack and insert the radius
arm into it's bracket. Install the other radius arm bushing and washer and get the nut started. (Don't worry about
tightening it down quite yet.) Insert the pivot end of the
I-beam into it's frame bracket and install the bolt/nut. Insert the coil
spring pads and coil springs, then gently lift the assembly with the
jack until the spring's pigtail is resting in the spring tower's groove,
and install the spring retaining strap. Now go ahead and tighten each
radius arm's nut and remove the jack.
From here on out
it's pretty much a no-brainer. Simply install the disc brake dust
shields on the spindles, then the rotors on the spindles. (You ARE using
new bearings and seals in the rotors, right?) Secure the rotors and
install the dust caps.
Now we're ready
for the installation of the steering linkage. Remember I told you back on Page 1 that
you'd need to get the steering components from your donor truck? Well,
here's why: the disc brake spindles' steering arm is thicker than the
drum brake's, so the tie rod end's taper is going to be too short (Fig. 12). So you're either going to have to use all the steering pieces
from your donor truck or do some grinding on the spindle's steering arm
to remove about 1/4" of it's thickness (Fig. 13). I opted for
replacing all the steering components with new pieces, simply ordering
pieces for a '79 F-150 and they installed without a hitch.
Don't forget
to get your alignment checked before hitting the streets! |

Fig. 5 - Install the radius
arm onto the I-beam & spindle assembly and insert the coil spring
bolt...

Fig. 6 - ...and then install
the whole assembly onto the frame.

Fig. 7 - Next install the coil springs, cups and retaining
straps. You can see the holes in the frame just to the right of
the coil where the line brackets will be installed, but using
newly drilled holes for the new brackets.
|

Fig. 8 - Here's a shot of the bare spindle with the disc brake
dust shield installed.
|

Fig. 9 - Here is one of the
new rotors ready for a new inner bearing and seal... |

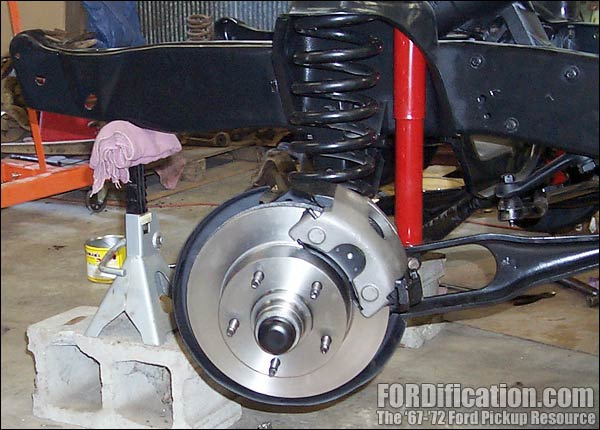
Fig. 10 - ...and here's the new rotor and caliper installed.
Looks good! |

Fig. 11 - A shot of the installed front brake units. Be sure
to check for proper wheel clearance! |

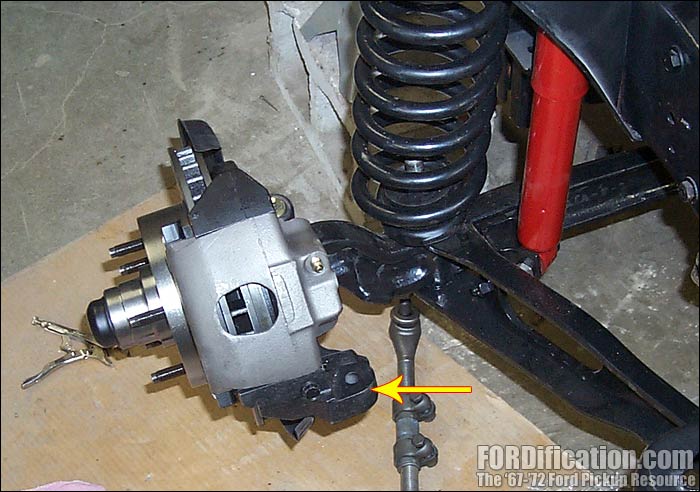
Fig. 12 - Here's a view of the differences of the stock '67-'72
tie rod ends vs. '73-'79 pieces, where they connect to the spindle. |

Fig. 13 - The '73-up spindle's
steering arm is thicker than the '67-'72 versions. |
|
Congratulations! You now have most of the main hardware installed
for your disc brake conversion. All that remains is to install the brake
lines and associated hardware, like the combination valve (sometimes
referred to the proportioning valve). You'll have
to drill holes in the frame to install the disc brake line brackets, and
then to install the flexible lines to the calipers. These flexible lines
should always be replaced. While they might look good on the outside,
it's very possible that time hasn't been nice to them on the inside, and
you'd never know it. Rubber brake lines will swell over time, completely
sealing themselves off and preventing fluid transfer. Don't get cheap here...just replace the lines!
All that remains is
the necessary brake line bending and installation. While pre-bent brake
lines are available from aftermarket sources like
Inline Tube in both steel and
stainless steel which includes all the proper fittings and armor around
the tight bends, I've decided that for my project I wanted to bend my
own. The last time I checked, Inline's price for standard steel lines
for a truck was about $155, but the straight lengths of line and the
necessary fittings at my local auto parts store, enough to do all the
hard lines on my pickup front-to-back, came to less than $25. You'll
probably have to go back to pick up some more lines after you get started
learning how to bend and double-flare the lines, but you can easily handle
that cost. For example, a 60" length of standard 3/16" steel brake line,
already double-flared on each and with fittings, was about $6 at my
local auto parts store. At the price, the education will be fairly cheap....and
easy! Many of you might at first might be a bit intimidated at the
prospect of bending your own brake lines, but it's so much easier than
you think. The lines are very easy to bend and won't kink unless you try
to a really tight radius bend.
In the end, I was able
to completely replace every hard steel line on my truck for about $30 in
line and fittings from the parts store, and it only took me a weekend
working at a slow pace. At first I did borrow a nice double-flare tool
from a friend, but it went so well that I decided to buy a set myself.
I've used it on several projects for both brake and fuel lines. It's
money well spent. |
|
 |

Want to link to
this site? Please save this banner to your hard drive to place on your
webpage.
The correct link to use is
http://www.fordification.com
|