|


|

|
'68 F100 SWB 4WD Ranger Parts Truck Pics |
|
 |
|
Tuesday,
May 23, 2006 - The pictures on this page are
just an archive of 'before' shots, taken before I roll this into
the shop to get started on the teardown. It's also going to be a
way for me to post reference pictures needed for my own research
into various components of this truck. Although I've gotten
fairly knowledgeable about 2WDs from the dozen or so trucks I've
parted out over the past few years, this is the first 4WD I've
gotten my hands on, so I'm going to be asking a lot of questions
and doing a lot of research in the coming months to figure out
what I've got and what I can do with it, should I decide to keep
the rest of the truck after saving the box for my project truck.
I started off
by checking the VIN stamping on the passenger-side framerail,
but I must have gotten it wrong. I had to use a mirror to see
it, and I didn't notice until I got home that there seems to be
an additional digit in the VIN. The stamping I have jotted down
here in my notebook is F114C788193. However, according to
my sources, there wasn't an F114, the numbers only go up to
F113. Also, there seems to be an additional digit in the
consecutive unit number....so I'm going to have to go back and
re-check it. The VIN tag on the driver's door is from a late-'69
LWB truck, and it's held on by factory rivets, so the door has
obviously been replaced at some point.
Anyway, this is
either a '68 or '69 F100 Ranger SWB 4WD. It was originally
equipped with an I6 engine (240/300) and a manual three-speed
transmission with a column shifter. A previous owner installed
an FE (360/390) and NP435 transmission. The truck is still
equipped with the 6-cylinder radiator support and radiator. The
transmission tunnel has been cut out to fit the 4-speed
transmission. I'm not sure of the transfer case model, so I'll
be researching this. (There's a photo of it below.)
Overall there's
a lot of surface rust, but not a lot of rust-through, although
there IS a lot of pitting on all bare metal surfaces. There are
also a lot of drilled holes, including the front cowl panel,
floorpans and the top bed panels. There are a few small holes in
the box floor and the driver's-side floorpan. The front cab
mounts are rust-free, as is the radiator support, but the rear
cab corners would need replaced. |
|

Fig. 01 -
Well, here it is prior to any cleaning. First on the agenda was
cleaning the trash out of the back, including the huge ant
colony that had set up residence. |

Fig. 02 -
The left fender wasn't bolted on at the back and flapped in the
wind all the way home. |

Fig. 03 - Here's the '69 aluminum grille,
painted and bent up. The lower valance panel is bent up but
rust-free. |
 |

Fig. 04 - What remains of the FE has been
open to the elements without a hood for some time, so I doubt
it's salvageable. Note the broken rocker shaft on top...I found
the other half in the back. |

Fig. 05 -
The left-side inner fenderwell is a 2WD unit that has been
torched out by a previous owner to fit the 4WD spring/shock
tower and bent to clear the steering box. |

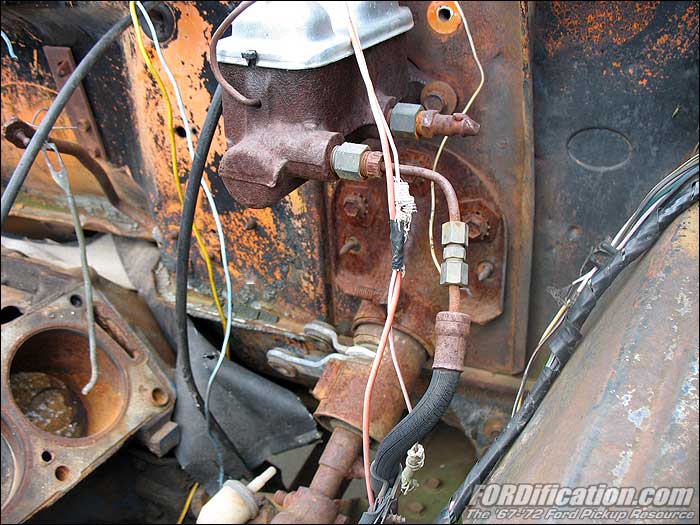
Fig. 06 -
HOLY COW! Talk about redneck engineering!! The rear master
cylinder reservoir has a quick-disconnect fitting threaded in
and welded up (so no front brakes!), and the front reservoir has
a rubber line spliced in, which runs down to the frame-mounted
brake distribution block. |
|
|

Fig. 07 -
The tranny tunnel has been cut out to fit the NP435, and the
dash has been cut up for an aftermarket radio. |

Fig. 08 -
The dreaded driprail rot is just getting started on this cab,
but it's not too bad yet. At first glance it appears to be just
a couple small spots, but the surrounding metal is probably
getting thin. |

Fig. 09 -
Check out the cool door accessory left by a previous reptilian
tenant. |
|
|

Fig. 10 -
The cowl panel has a drilled hole in it for who-knows-what.
|

Fig. 11 -
Both front cab mounts appear to be in great shape. This
right-side mount |

Fig. 11 -
Hitting the cab with the water hose, rinsing out dust and
dirt....and a squirrel's large collection of nut shells. |
|
|

Fig. 13 - The lower rear bed panel is
slightly bent, but has no rust. This will be an easy fix. |

Fig. 14 -
There are chunks of heavy channel-iron welded to the front frame
stubs, probably for a homemade push bar or grille guard.
|

Fig. 15 -
Several sections of the body, including this left-rear box
endcap, have pitted sheetmetal. However, a light sandblasting
followed by some some block-sanding should smooth this out,
though it's possible I'll have to use a very thin layer of body
filler in these spots. |
|
|
|

Fig. 16 -
Right side |
The seller says years ago when the
truck was running, his wife got it stuck. To get it out, he
hooked onto the back of the bed with a boom truck to lift it up
and out of the ditch, not realizing that the back of the box
wasn't bolted down, which resulted in the box being lifted up
into the cab to create these dents. |

Fig. 17 -
Left side |
|
|
|

Fig. 18 |
After cleaning the trash out of
the back and rinsing it out, I can see that the trash caused
some rust on the bed floor. It's just turning into scaly rust
right in the middle. You can also see some rust on the back lip
of the floor, and there's another spot up along the front where
the floor has rusted out a 3"-square section. I could either
just replace the bed floor with the good one I have, or just cut
patch panels from the good floor and weld them in. Since the
inside of the bed will be coated with bedliner anyway, the
patches would be virtually invisible and would probably be fine
for a daily driver. The right-side wheelwell is perfect, the
left side has two tiny dings in it...and the bed sides are
rust-free, though they have some drilled holes to weld up. The
bedside seams are also rust-free. |
|
|
|
RIGHT
(PASSENGER) SIDE

Fig. 19

Fig. 20

Fig. 21 |
These photos are of the motor
mounts and engine's frame stands, and the reason I'm posting
them here is to try to get some info about whether these are
stock or not. They appear to have been altered, or at least
moved...and then welded in with a wire-feed welder. Since the
clutch Z-bar is at such a bad angle (Fig. 22, below), it almost
appears as if the engine stands are too low. (I will attempt to
get some better pictures of these when I return to the shop.)

Fig. 22 |
LEFT
(DRIVER) SIDE

Fig. 23

Fig. 24 |
|
|
|

Fig. 25 |

Fig. 26 |

Fig. 27 |
|
These three
pictures are of the front differential, a Dana 44 with 3.73
gears. |
|
|
|

Fig. 28 |
The left-side cab corner has a
little rust-through and some body filler. The right-side also
has a little rust-through, but no filler. The right-side is
definitely savable, though the left-side piece might need a
little more work. |

Fig. 29 |
|
|
Fig. 30 - Though not
very obvious in this picture, the left rearmost section of the
lower bed panel is slightly wavy with a little body filler over
it. This will be a fairly easy fix. |

Fig. 31 - The
manual-steering gearbox |

Fig. 32 - The Warn
lock-out hubs |
|
|
|
 |
Fig. 33 - Here's a
shot of the back of the NP-435 transmission and the transfer
case, as viewed down through the tranny tunnel from the
passenger side. As you can see, the shifter is missing. When the
previous owner installed the FE/4-spd, he cut out the tranny
tunnel, but at least it wasn't butchered like most I've seen. It
would be very easy to mount the bolt-on tunnel cover that came
with factory 4-spds. As a matter of fact I found one with the
correct shifter holes in the bed of the truck mixed in with all
the trash. |
|
Well, there
you go. You can see that although this truck does appear
rough, it's actually in fairly decent shape overall, and it
would almost be a shame to part it out and scrap it. I'm
giving some serious consideration to making this another
project truck, though not to the extent of my '67. I'd just
clean it up, bang out the sheetmetal as needed and install a
running FE. I have enough left-over parts from the other
trucks I've parted out that I could have a nice-running 4x4
for a minimal investment. Of course, it won't have a box,
since that's going onto the '67 project, but I'm sure I
could come up with something useable, even if it meant just
installing a flatbed. We'll see.
This coming
weekend is Memorial Day weekend, and I'm hoping to get one
day in the shop to get started on removing the floorpan of
this box to weld in the replacement I have. Stay tuned! |
|
 |

Want to link to
this site? Please save this banner to your hard drive to place on your
webpage.
The correct link to use is
http://www.fordification.com
|