Where do I start?
Moderator: FORDification
-
zentar

- New Member

- Posts: 64
- Joined: Mon Jan 10, 2005 12:24 pm
- Location: Arkansas, Bella Vista
Where do I start?
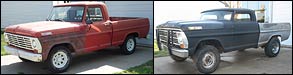
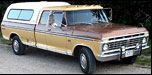
I just got my truck yesterday and I know its going to be a long term project so I have only one question for now.WHERE DO I START? The body has nothing but surface rust and very little "dings" in it.The 360 is shot and all the tires are flat.Any sugestions on what to take off first aand how to get those rusty bolts out?Iam going to take it down to the frame and make it look like it did when my grandpa drove it off the lot Aug. 3,1972. Iam going to take my time and do this thing right.After all, my son is growing up and mabey if this takes awile he wait a little longer to grow up.
-
FORDification

- Site & Forum Admin

- Posts: 8049
- Joined: Sun Jul 11, 2004 12:52 am
- Location: Kansas, Wellsville
- Contact:
re: Where do I start?
So do you have a shop to do this in, where everthing will be contained in one spot? You're gonna find you're gonna run out of room darned quickly once this thing starts coming apart. Having a set of shop manuals will prove invaluable during disassembly. There will be time when you can't visualize how something needs to be removed/reassembled, and the diagrams will save you from ruining a good part by forcing or cutting something.
The key to getting your project done is preparation. The absolute BEST thing you can do is invest in a case of ZipLoc bags...the freezer kind with the label to write on, so that you can mark absolutely everything that gets removed. When you remove the hood bolts, place them in a Ziploc and mark them "hood bolts", and repeat that for everything you remove. Several rolls of masking tape is also essential, for marking larger items and wire connections. Keep a notebook on hand to jot down anything you'll need to remember...by no means try to rely on your memory! Get a digital camera and then just go nuts taking pictures of absolutely everything...the closer the better. You'll be surprised just how often you're going to be referring to these down the road. If you remove shims somewhere, make a note as to how many shims went in what spot. When you disconnect a wire, put a piece of masking tape on the wire and the connection point so you'll know how to hook it back up later.
Since the box will probably be the last thing to get worked on, take it and the rear bumper off first, so it can be set aside and give you easy access to the rear suspension. There are only a few bolts holding it to the frame and a couple wires for the taillights. If you're storing this in your work area (shop) you can set it up on end against the wall so it'll be out of the way. If you store it outside, put a tarp over it. Depending on how long your project will take, you don't want water collection inside and rusting it out before you get around to working on it. Better yet, pick up an old topper to set on the box...that way you can use the box for outside storage of truck parts, so they won't be in your way in the shop but will remain dry.
Then I'd start with the front-end sheetmetal, in this order: the front bumper, the hood, the grille assembly, the fenders, inner fenderwells, and finally the radiator support. Then you can pull the engine/transmission (as a unit, makes removal easier), and finally get started with stripping out the interior.
Once the interior is out, there are only four bolts holding the cab on the frame...remove them, and you can lift the cab off.
Now you should be down to a rolling chassis. From there it's pretty easy.
Take your time. It's easy to get caught up on disassembly by simply removing bolts and screws and then setting another piece aside, but if you go too fast, you're going to forget to take a necessary picture or jot down some tidbit that you're not going to remember when it's time to reassemble.
...and if you have any questions (and I'm sure you're going to have a ton of them), we're here for ya.
You might want to spend an evening reading through my buildup pages, starting at PAGE 1. I think it might help a bit to see how I did it....at least you'll get an idea of what you're in store for.
I'm sure I'm leaving out a lot of details, but this will get you started. The important part is to take your time, enjoy yourself, be safe and not to get overwhelmed. A lot of the work you're going to have to do is dirty/greasy/tedious stuff, but it'll be a labor of love. There are going to be times you want to throw your hands up and say "SCREW IT" and walk away....but just like a good marriage, you have to be committed. You've got a great support group here.
Good luck!
____| \__
-O-----O- Keith
'67 F-100 2WD SWB ~ '69 F-100 4WD SWB w/7" chop ~ 1975 F-250 Ranger XLT Supercab Camper Special

My '67 restoration video
-> Posting and you! <-a MUST watch for all!!
-O-----O- Keith
'67 F-100 2WD SWB ~ '69 F-100 4WD SWB w/7" chop ~ 1975 F-250 Ranger XLT Supercab Camper Special
My '67 restoration video
-> Posting and you! <-a MUST watch for all!!
-
oldschoolrods
- Preferred User

- Posts: 326
- Joined: Tue Aug 10, 2004 11:06 pm
- Location: Lancaster, Pennsylvania
re: Where do I start?
The best thing to do when working with these rusty bolts is get a LOT of PB blaster. That stuff will proove invaluable. Give all bolts to be removed a liberal spraying, multiple times daily for a few days is ideal. You may want to check out swap meets for a set of shop manuals as keith said, because the chilton manual available is pretty crappy to put it bluntly. The best advice I can offer is work on one system at a time, Ie do all the work that needs done on the brakes, then move on to exhaust or whatever. But don't get one thing started then start something else. This site is an excellent resource for all your questions.
-
hardtailjohn

- Preferred User
- Posts: 422
- Joined: Tue Dec 07, 2004 10:24 pm
- Location: Montana, Marion
re: Where do I start?
Mouse Milk is the best rust penatrant I've ever used!! And I ditto the digital camera thing... but make sure you take a series of everything and from different angles.. you'll be suprised at how something can look so different from a different view!
The notebook is an essential for disassembly as well as assembly, and the ziplocks and paper tags and masking tape are just as important. I do aircraft restoration, and those sometimes take many years to get done, so documentation is very important when disassembling!!
But the most important thing is to enjoy yourselves and have fun, and from what you say, you've got that handled!
Good luck, and can't wait to see pics!!
John H.
-
oldschoolrods
- Preferred User
- Posts: 326
- Joined: Tue Aug 10, 2004 11:06 pm
- Location: Lancaster, Pennsylvania
re: Where do I start?
John where can you get this "mouse milk" stuff? I'd like to try it out...
-
hardtailjohn
- Preferred User
- Posts: 422
- Joined: Tue Dec 07, 2004 10:24 pm
- Location: Montana, Marion
re: Where do I start?
I've only seen it at aviation supply houses. You can try these...
www.aircraftspruce.com
www.chiefaircraft.com
They should be able to fix ya right up! It works better on exhaust than I ever thought possible!!
John H.
www.aircraftspruce.com
www.chiefaircraft.com
They should be able to fix ya right up! It works better on exhaust than I ever thought possible!!
John H.
-
zentar
- New Member
- Posts: 64
- Joined: Mon Jan 10, 2005 12:24 pm
- Location: Arkansas, Bella Vista
re: Where do I start?
I went to flight school in West Plains,MO. for a couple of weeks and just now got back.Iam a Paramedic and Iam fixing to start flying with Air-evac as a flight medic.Thanks for all the advice.Iam going to start taking pics of it tomarrow and if I can figure out how to put a few of the on the web site Ill let everyone see what it looks like before I take her all down and start all over.Be looking over the next couple of days because were having a warm spell(65 degrees) and Ive got the fever to get started so wish me luck and be ready to answer some questions. 