Making a T18 top end nice and tight: canes and top covers.
Moderators: FORDification, 70_F100
-
fordman
- 100% FORDified!

- Posts: 22329
- Joined: Sun Aug 28, 2005 8:17 pm
- Location: Kansas, Ottawa
- Contact:
Re: Making a T18 top end nice and tight: canes and top covers.
i was just messign with you on the crack thing. did your heart jump? did you go check it out as soon as you could?  i had to tease you.
-
70_F100

- Moderator

- Posts: 2999
- Joined: Mon Oct 22, 2007 11:23 am
- Location: North Carolina, Kernersville
Re: Making a T18 top end nice and tight: canes and top covers.
You and I will be LONG GONE before you ever have to replace that new one!!!
Wise men talk because they have something to say; fools talk because they have to say something.--Plato
Why is it that there's seldom time to fix it right the first time, but there's always time to fix it right the second time???
That's not an oil leak That's SWEAT from all that HORSEPOWER!!
Why is it that there's seldom time to fix it right the first time, but there's always time to fix it right the second time???
That's not an oil leak
-
robroy

- 100% FORDified!
- Posts: 3768
- Joined: Sun Jul 06, 2008 4:36 pm
- Location: California, Salinas
Re: Making a T18 top end nice and tight: canes and top covers.
You were successful in getting me to go look at it!fordman wrote:i was just messign with you on the crack thing. did your heart jump? did you go check it out as soon as you could?
This could be true! The truck's 37 years old, and I'm 29 years old. In another 37 years I'll be 66. But I may not put the number of miles on the truck that it has had up until now by then, and I'll certainly be more attentive to things like making sure the transmission oil is fresh.70_F100 wrote:You and I will be LONG GONE before you ever have to replace that new one!!!
Maybe I'll post to this thread again when I'm around 70 to discuss the new plate I'm installing! I'm sure Fordification will be running strong in year 2046.
Thanks Fordman and 70_F100!
Robroy
-
Mani
- New Member

- Posts: 1
- Joined: Sat Jan 17, 2009 1:16 pm
Re: Making a T18 top end nice and tight: canes and top covers.
Hi Robroy,
I've been following your project for awhile now. It looks like you're doing great!
Keep up the solid work.

I've been following your project for awhile now. It looks like you're doing great!
Keep up the solid work.
-
robroy
- 100% FORDified!
- Posts: 3768
- Joined: Sun Jul 06, 2008 4:36 pm
- Location: California, Salinas
Re: Making a T18 top end nice and tight: canes and top covers.
Hey you Shaggy Dog! Thanks for replying!Mani wrote:I've been following your project for awhile now. It looks like you're doing great!
Keep up the solid work.
To all other members: Mani has been my great friend for over 15 years, and he helped me transport the engine from my house to the project site. He also helped with the clutch/bellhousing area.
The tear down of the old T18 top plate is complete!
I started with hammering the roll pin out of the 3rd and 4th gear fork, since it had complete clearance for the pin to slide all the way out. A 3/16" punch worked perfectly.
With that roll pin removed, the fork was free to slide back and forth on the shaft. I stared at this in amazement as my brain slowly began to grasp how transmissions really work.
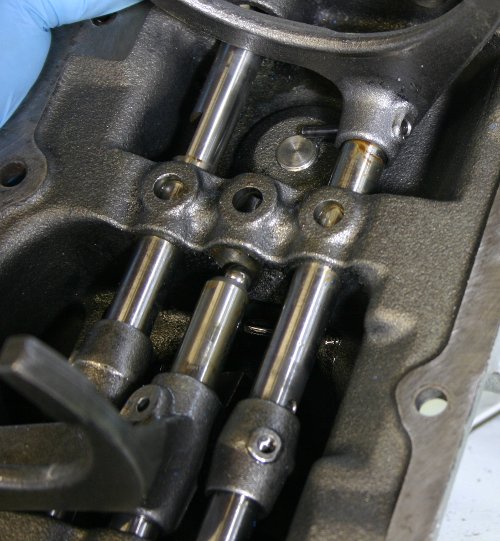
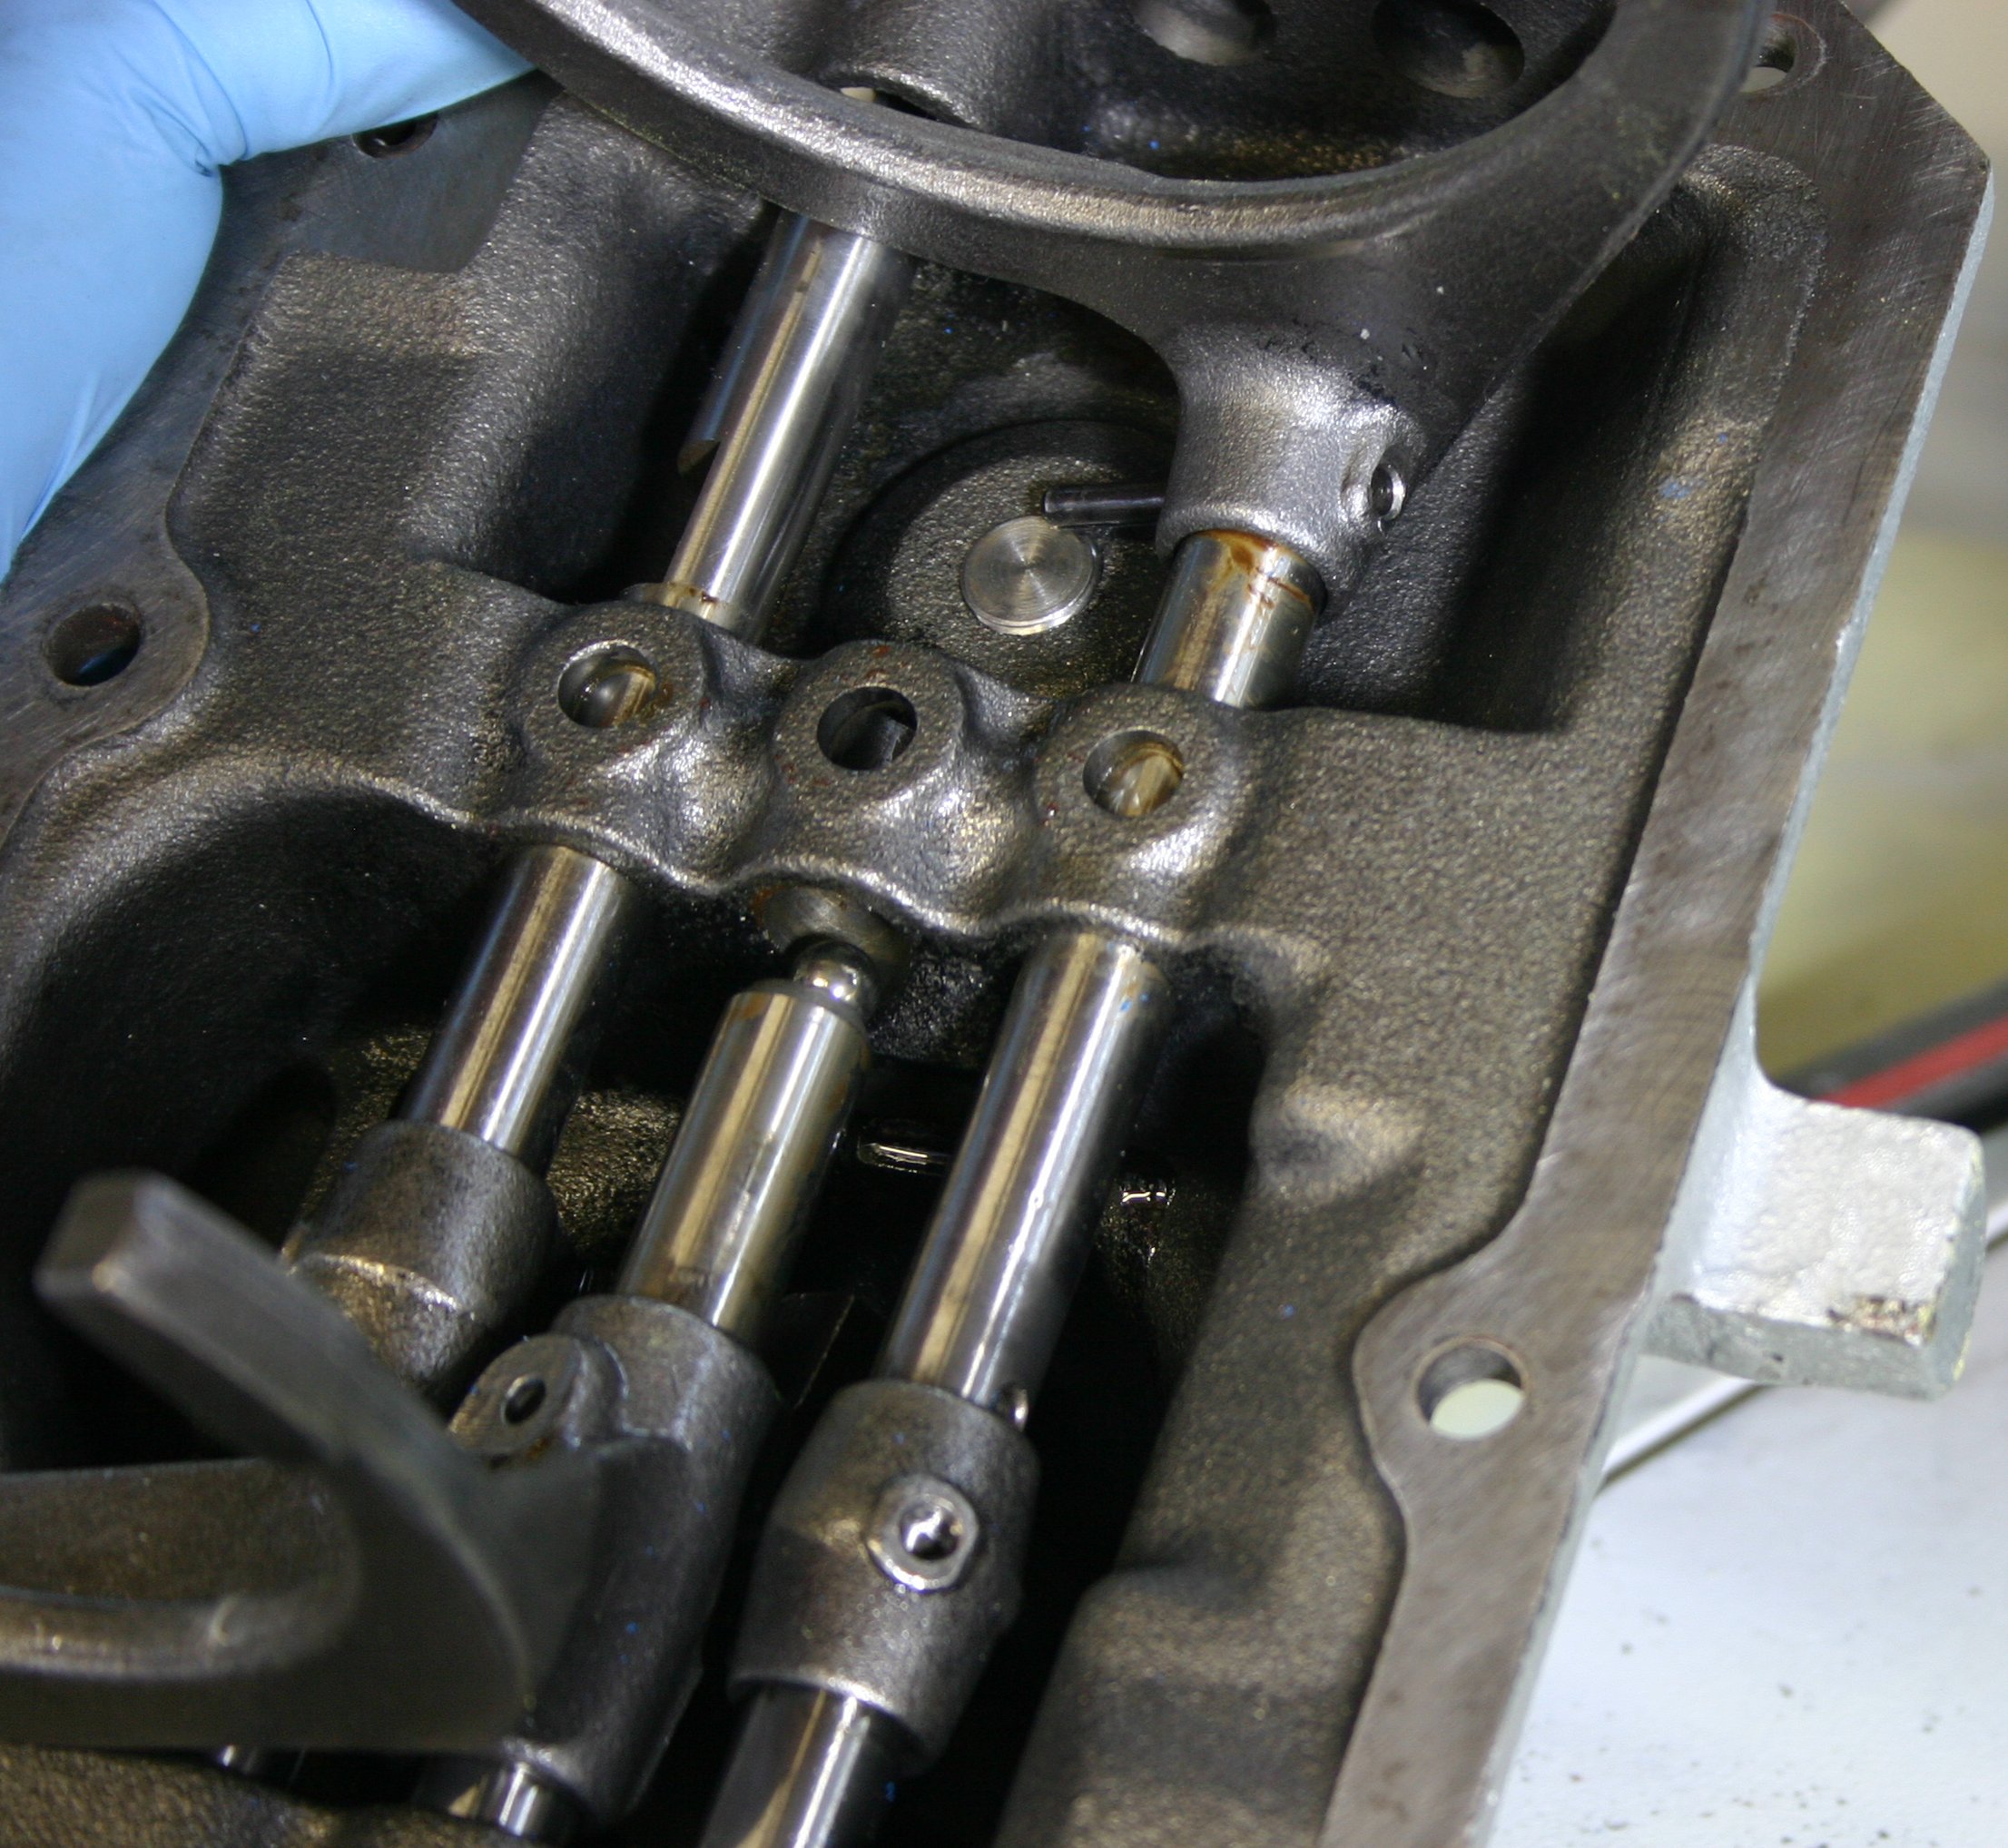
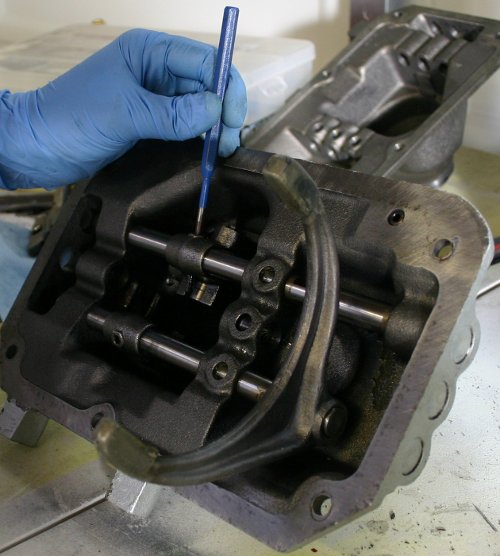
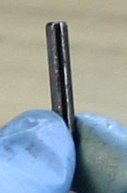
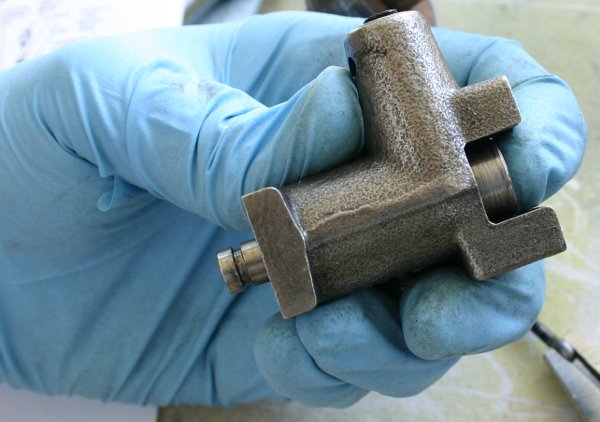
I pulled this special pin out of the pictured indentation in the 3rd/4th shaft; the first question in my list at the end of this post pertains to this pin.

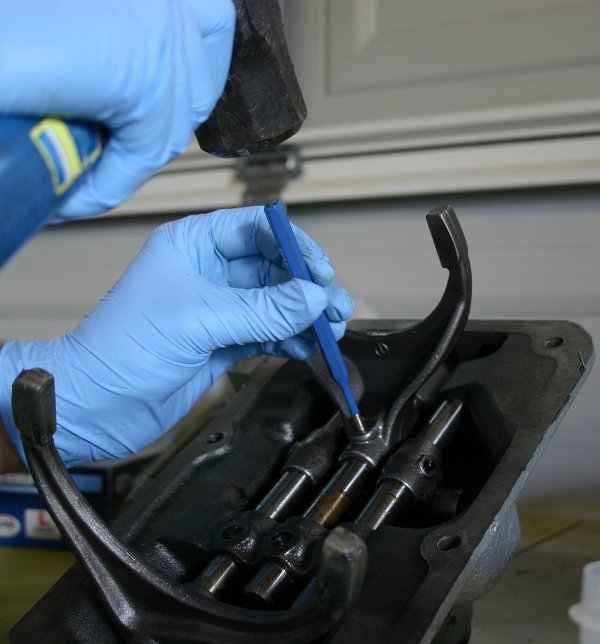
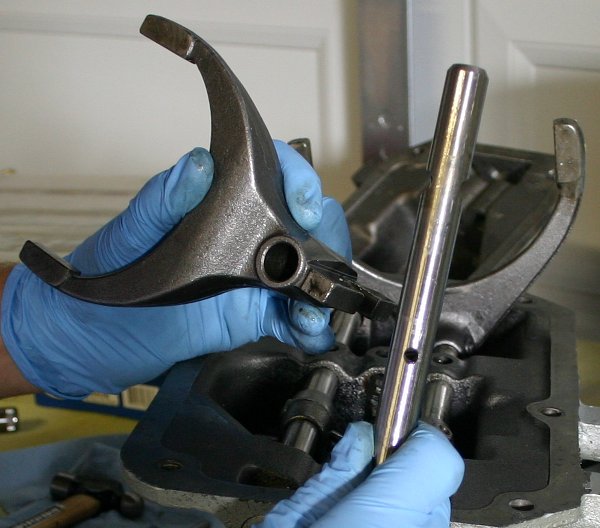
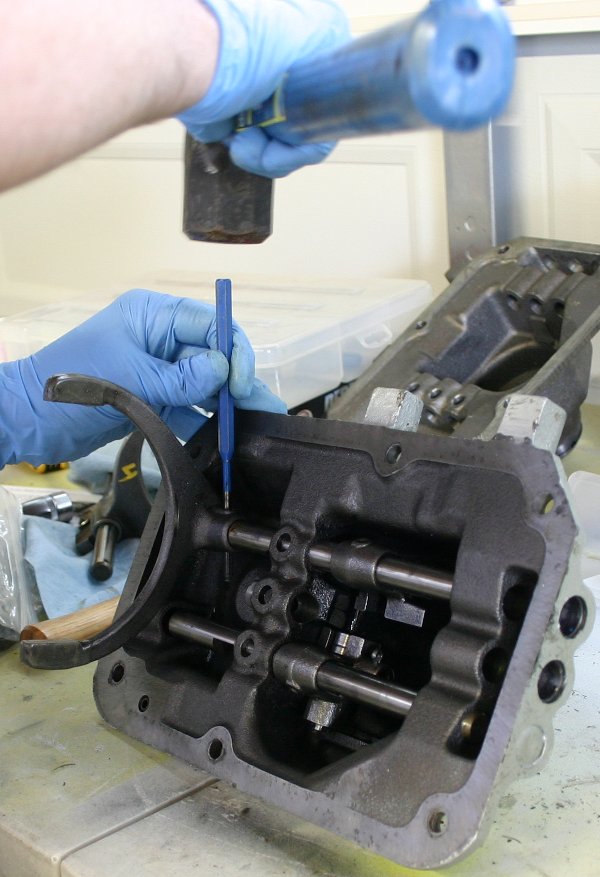
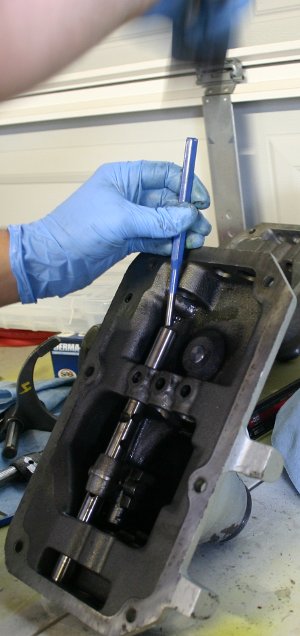
Following 70_F100's advice, I tried to tap the expansion plug out using the shaft itself as a punch. It didn't take very much force, thankfully!
I'm gently tapping on the head of that shaft, forcing the expansion plug out. I wanted to find some kind of soft punch, perhaps made of brass, at the hardware store for this purpose, but found nothing like that.
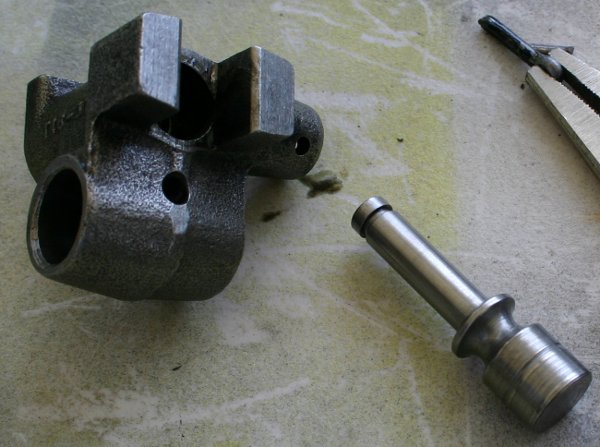
Emergence!
As the 3rd/4th shaft slide out of the housing, the spring-loaded sphere (372720-S) popped out. You can also see that I'd partially removed the roll pin from the 1st/2nd fork, but I didn't find enough clearance yet. Through trial and error I discovered a particular sequence of roll pin removal that worked best.
http://www.robroygregg.com/Number50/IMG_2978s2.JPG
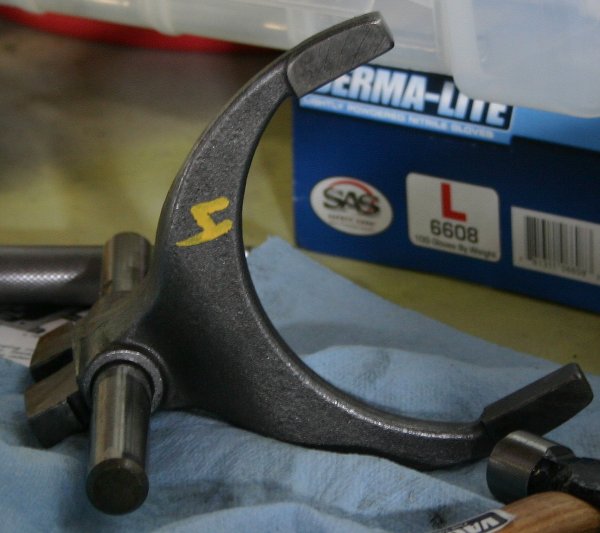
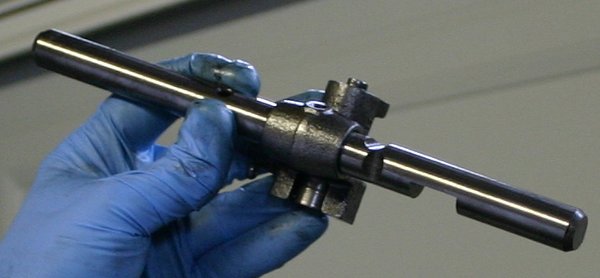
The 3rd/4th fork and shaft are free at last!
I marked it with a paint pen to keep my life in order.
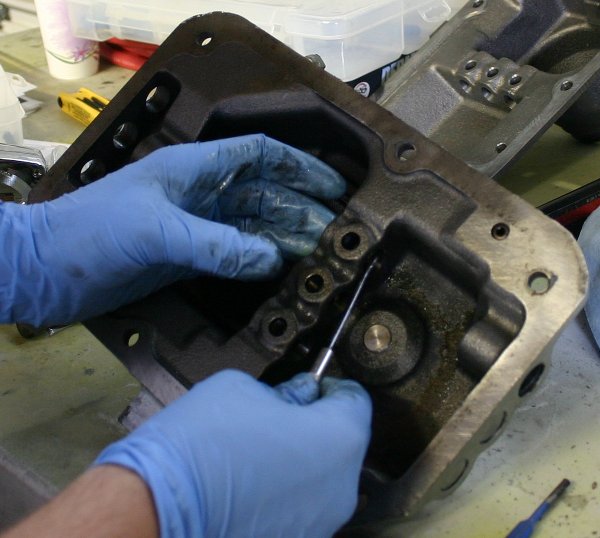
Now I'm removing the roll pin for the reverse gate (7232).
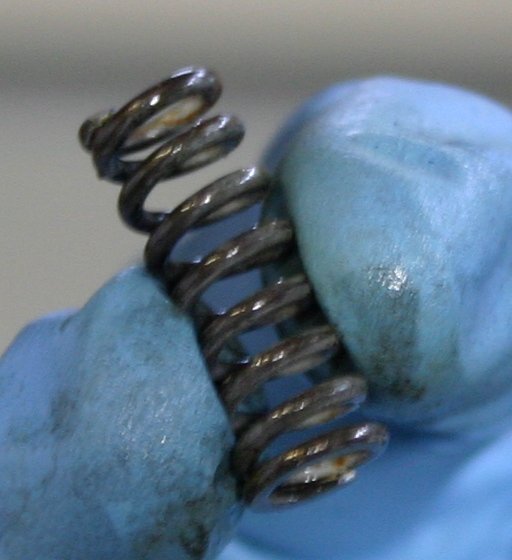
Here I'm extracting the shaft lock plunger spring (7234) for the 3rd/4th shaft.

And here's 7234 up close. After removing the 7234 springs for the other shafts, I noticed that two appear quite new, while this one appears old--perhaps two were replaced by the transmission man.
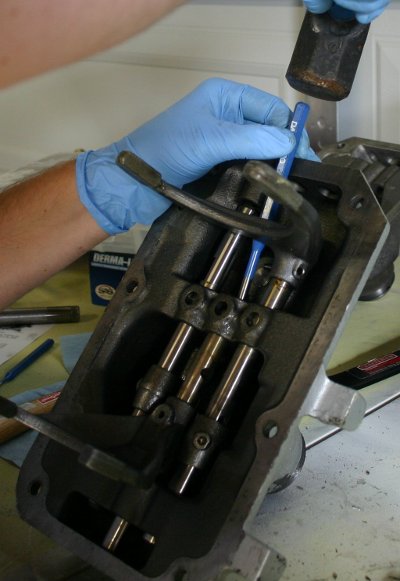
Here's the removal of the roll pin for the 1st/2nd fork.
And the roll pin found throughout the assembly.
Here I'm popping the expansion plug out for the reverse shaft.
The liberated reverse shaft and gate.
The removal of the shaft lock plunger spring (7234) from the reverse shaft area.
My next task will be a minute inspection of all the pins, balls, and springs. Then I'll take the reverse gate assembly apart, since the feeling in the cane while shoving to the right to access the reverse area wasn't ideal; maybe there's something in there that can be improved!
Questions:
- What is the purpose of the special pin pulled from the 3rd/4th shaft (shown in the second photo in this post)? It's perpendicular to the concave bumps in the shaft that locate the shaft in its different positions. And why is it that only the 3rd/4th shaft seems to have this pin? I can see its shaft indentation in the Manual diagram, but not the pin itself. (I just had a revelation: is this pin 7235, in the center of the shaft lock plunger?)
- While removing the reverse gate's roll pin, this pill-shaped pin sprang in to existence. I failed to note from whence it came! Could this pin be part of 7233, the shaft lock plunger?
Robroy
-
robroy
- 100% FORDified!
- Posts: 3768
- Joined: Sun Jul 06, 2008 4:36 pm
- Location: California, Salinas
Re: Making a T18 top end nice and tight: canes and top covers.
After looking at the diagram several more times, I'm now convinced that the small pin and two larger, pill-shaped pins I'm asking about in my previous post are indeed 7235 and the shaft lock plungers, 7233.
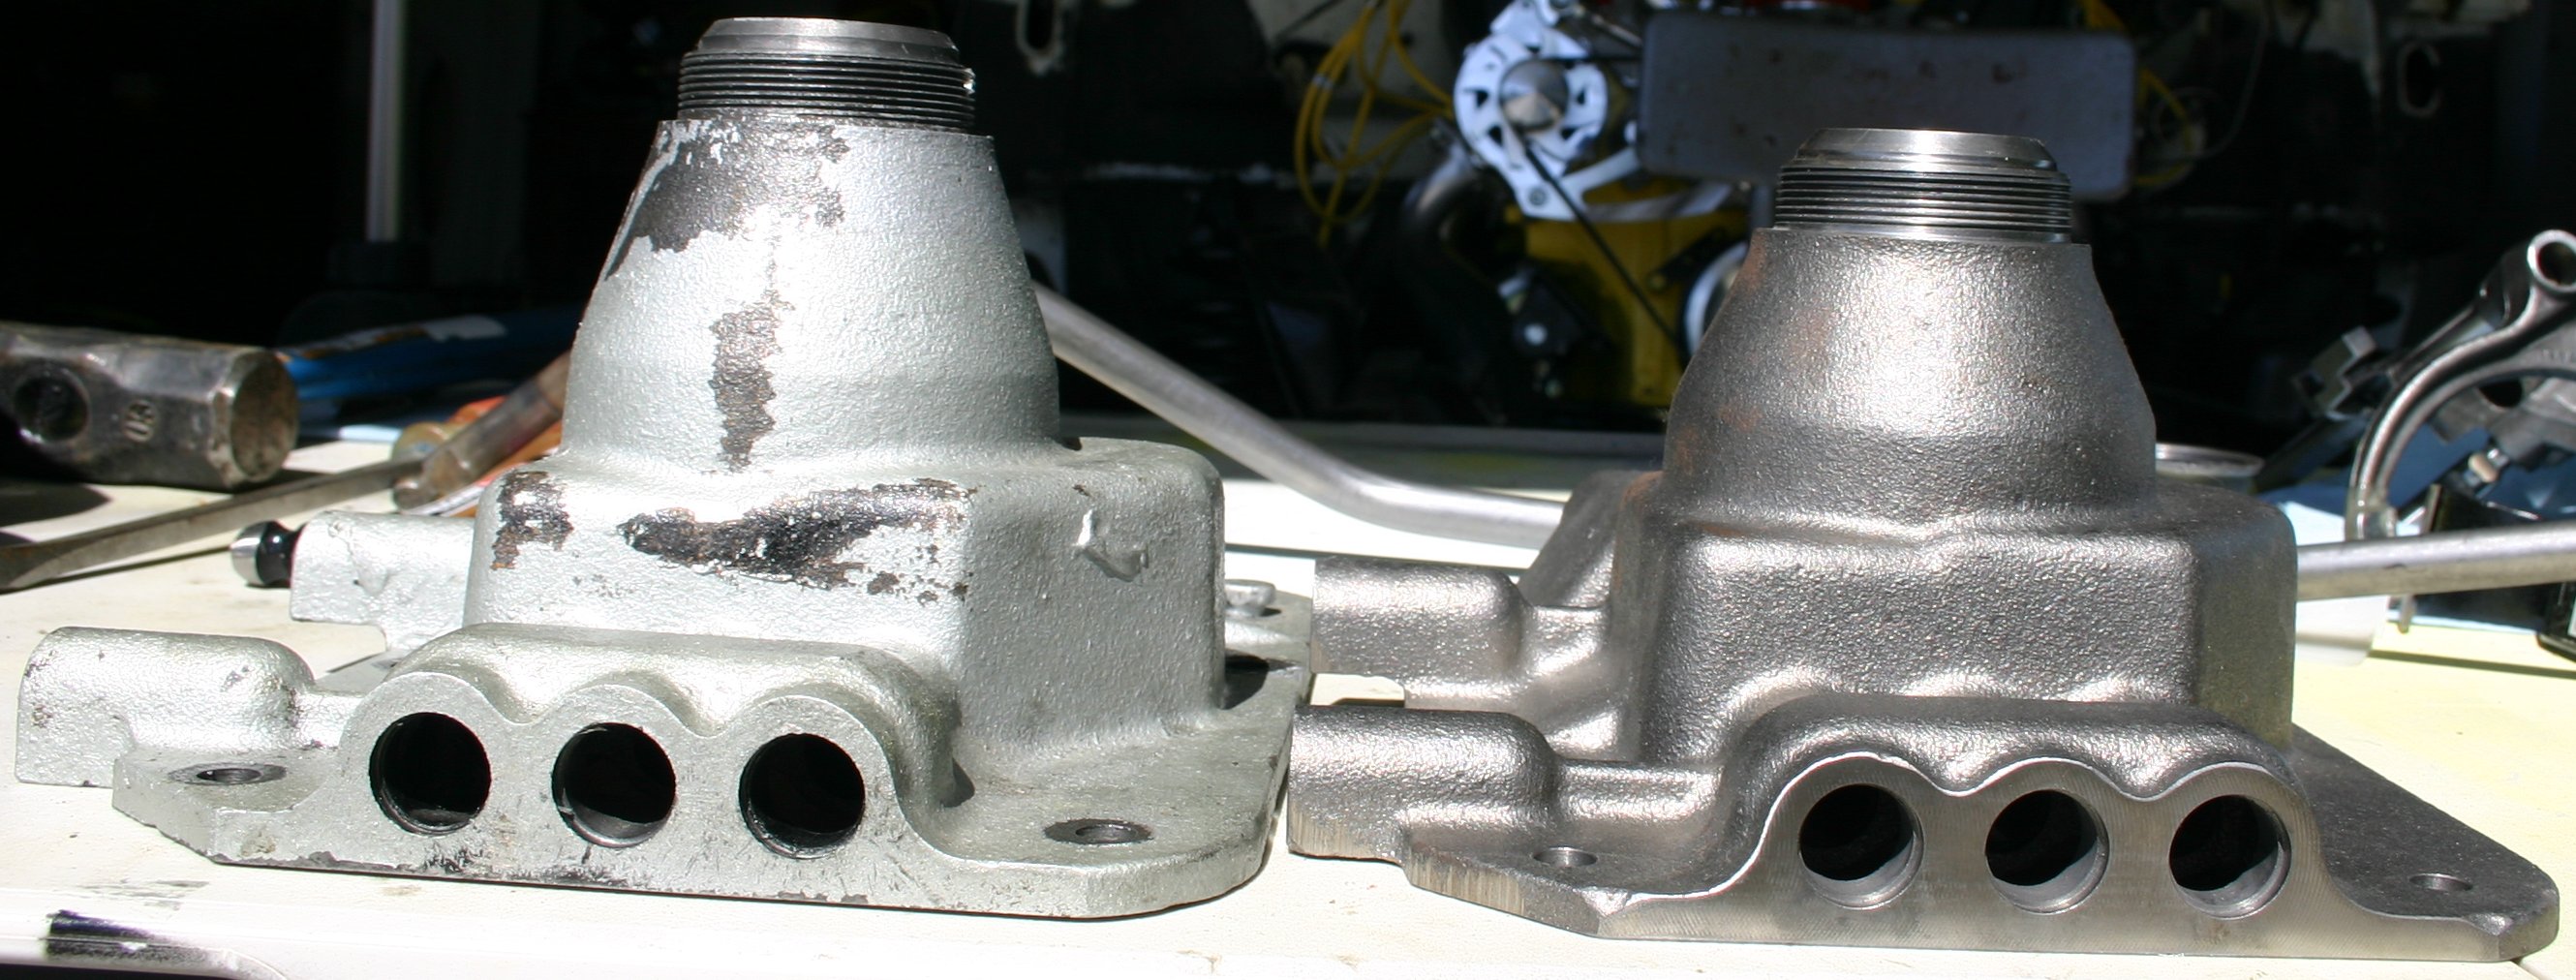
Now that I've had a chance to inspect all the parts more closely I have a few more questions! They're in a list at the end.
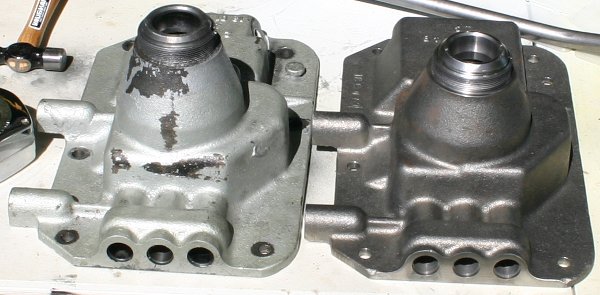
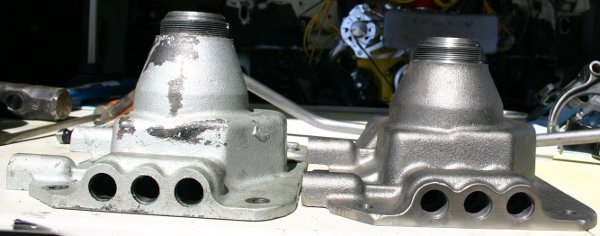
With the innards removed, the two top plates may be compared more easily.
http://www.robroygregg.com/Number50/IMG_3035s2.JPG
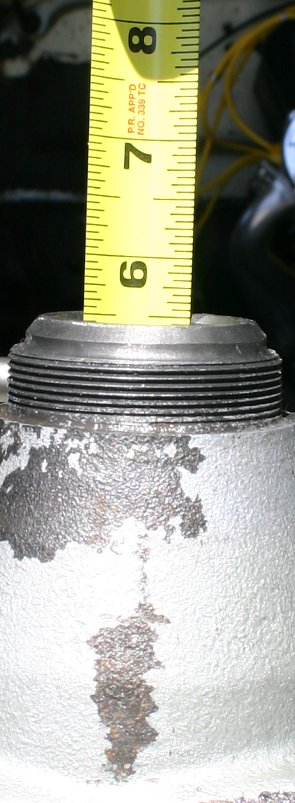
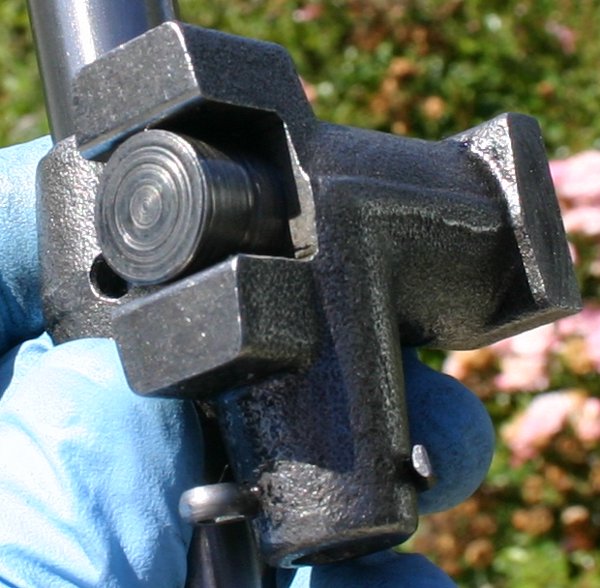
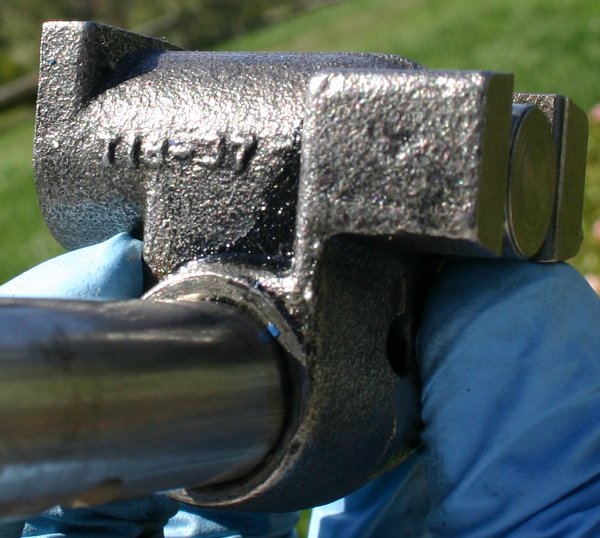
As I already stated in a previous post, I'll need a cane with a 1 and 1/8" fork for the new top plate; here's how I discovered this (the old plate's on the left):
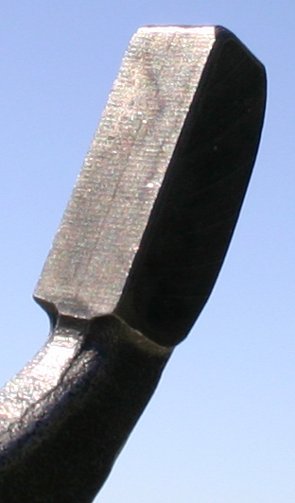
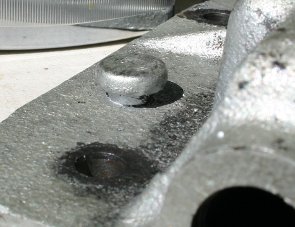
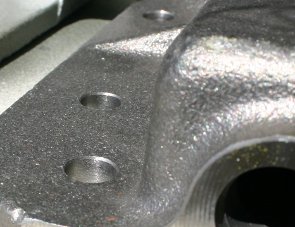
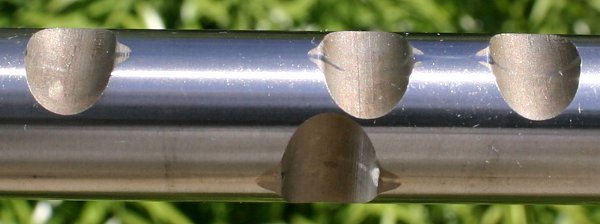
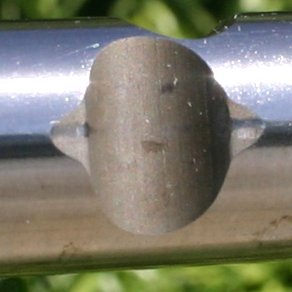
A closer comparison between the wear points that provoked me to action; the old plate's shown first (on top) and on the left, respectively:

The old top plate has over 3/32" of fore/aft play in the socket, which really feels like a lot more at the end of the long cane!
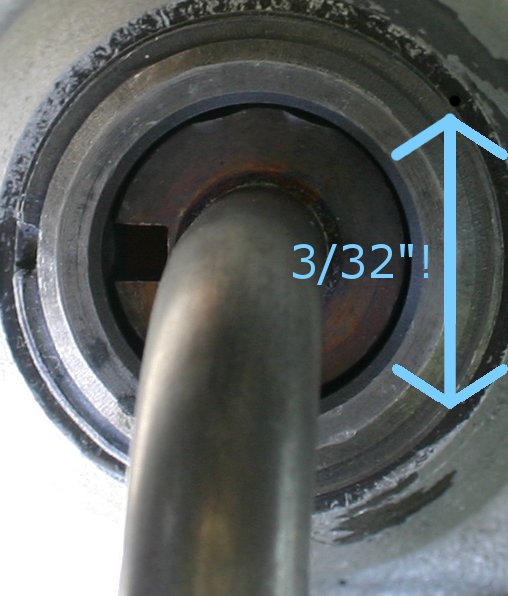
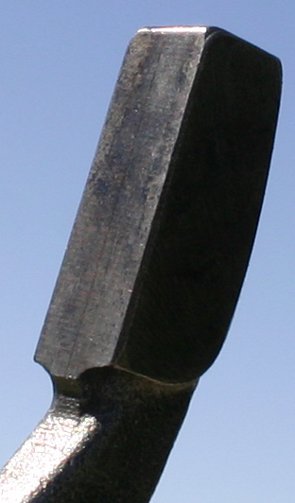
The new top plate has basically zero play in the socket, of any kind--the fit's perfect.
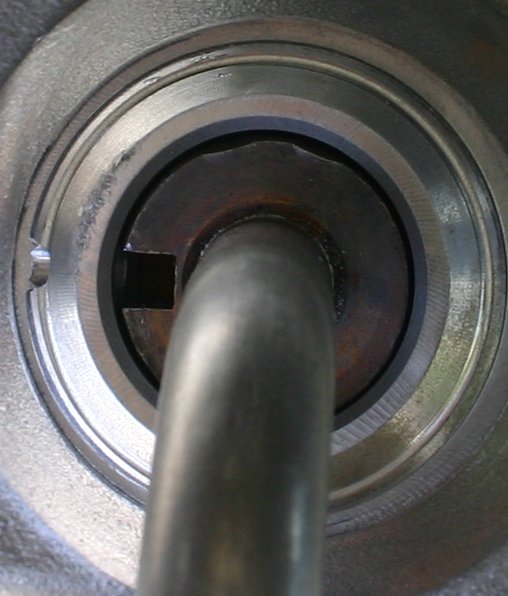
In the old top plate, you can see a ridge in the metal where it didn't wear away, since that part of the ball was kept from moving around by the pin. Check out the contrast between the old and new.
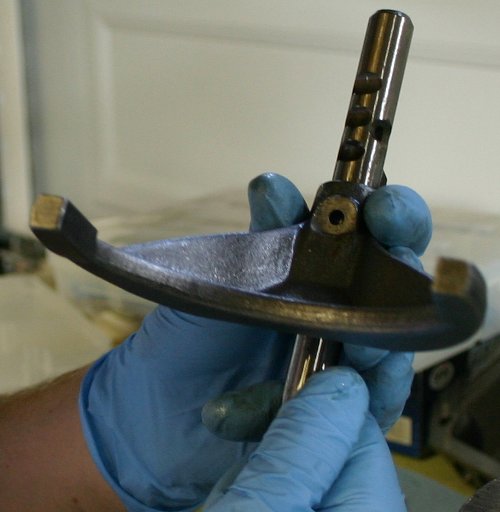
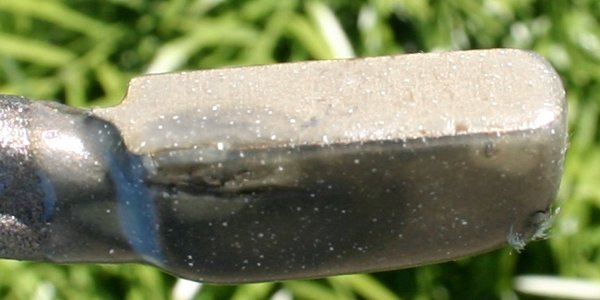
Here are the fork surfaces for the 3rd/4th shift fork. This fork is brand new; the transmission guy put it in.
I pulled the reverse gate apart. When fully assembled, it put a funky, rough feeling in the cane when pushed to the extreme right (to access the reverse setting), so I was looking for worn parts here.
Using pliers I could depress the plunger--I confirmed that the action felt pretty rough.
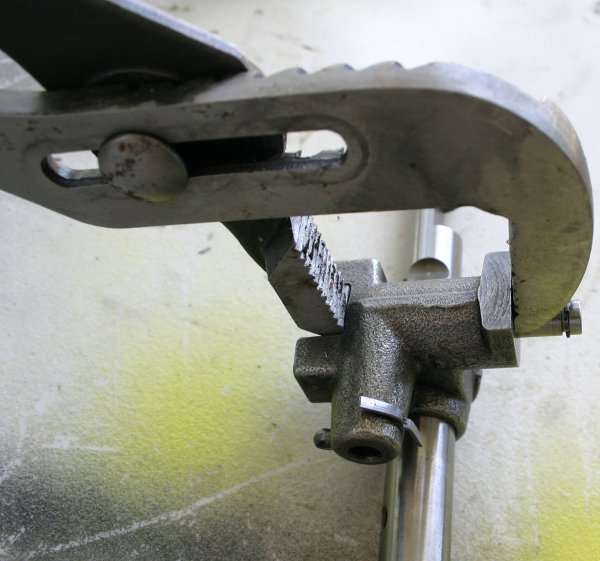
I removed the C clip and pulled the cotter pin out.
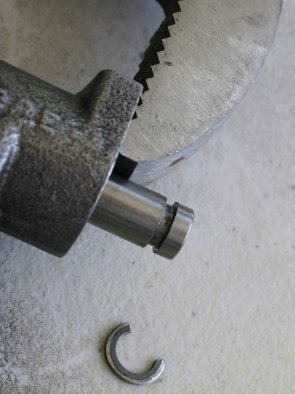
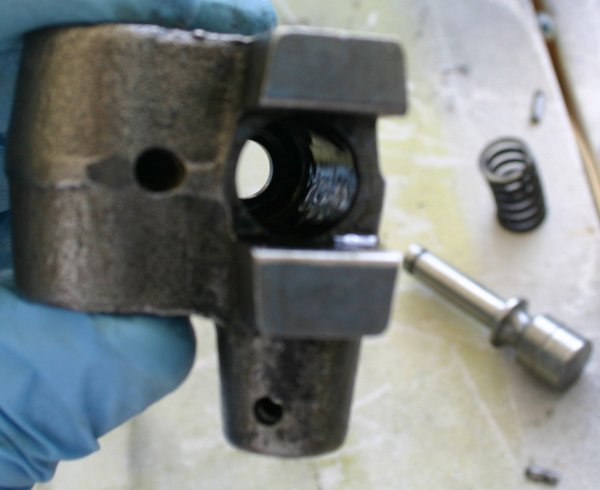
Once I'd removed the cotter pin, the spring (7234) poked its head up. It didn't boing out and fly across the room, as I'd half expected.
With the tension taken off the 7234 spring, I could depress the plunger by hand. It still felt quite funky.
Here's 7234 and the ball that it pushes against.
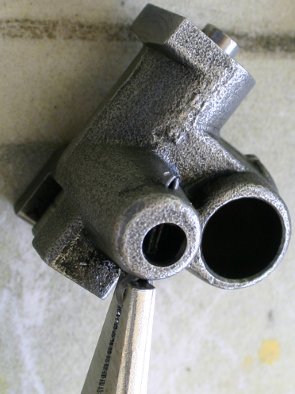
With this stuff removed it was possible to push the reverse shifter shaft plunger (7219) out completely.
I figured the surface inside of the reverse gate (7232) would be all rough, but felt perfectly smooth.
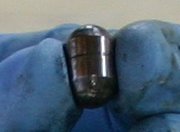
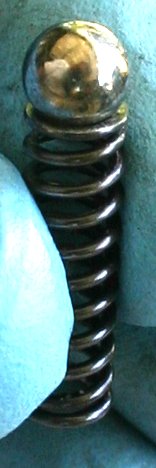
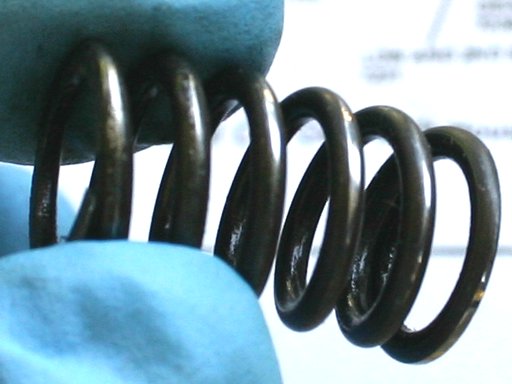
This spring, (7219) was the culprit for all the roughness! As you can see somewhat in this photo, it's not straight; it's bowed. And due to its bowed shape, it drags along the cylinder inside the reverse gate (7232) and causes that funky feeling!
And now for some specific questions:
Robroy
Now that I've had a chance to inspect all the parts more closely I have a few more questions! They're in a list at the end.
With the innards removed, the two top plates may be compared more easily.
http://www.robroygregg.com/Number50/IMG_3035s2.JPG
As I already stated in a previous post, I'll need a cane with a 1 and 1/8" fork for the new top plate; here's how I discovered this (the old plate's on the left):
A closer comparison between the wear points that provoked me to action; the old plate's shown first (on top) and on the left, respectively:
The old top plate has over 3/32" of fore/aft play in the socket, which really feels like a lot more at the end of the long cane!
The new top plate has basically zero play in the socket, of any kind--the fit's perfect.
In the old top plate, you can see a ridge in the metal where it didn't wear away, since that part of the ball was kept from moving around by the pin. Check out the contrast between the old and new.
Here are the fork surfaces for the 3rd/4th shift fork. This fork is brand new; the transmission guy put it in.
I pulled the reverse gate apart. When fully assembled, it put a funky, rough feeling in the cane when pushed to the extreme right (to access the reverse setting), so I was looking for worn parts here.
Using pliers I could depress the plunger--I confirmed that the action felt pretty rough.
I removed the C clip and pulled the cotter pin out.
Once I'd removed the cotter pin, the spring (7234) poked its head up. It didn't boing out and fly across the room, as I'd half expected.
With the tension taken off the 7234 spring, I could depress the plunger by hand. It still felt quite funky.
Here's 7234 and the ball that it pushes against.
With this stuff removed it was possible to push the reverse shifter shaft plunger (7219) out completely.
I figured the surface inside of the reverse gate (7232) would be all rough, but felt perfectly smooth.
This spring, (7219) was the culprit for all the roughness! As you can see somewhat in this photo, it's not straight; it's bowed. And due to its bowed shape, it drags along the cylinder inside the reverse gate (7232) and causes that funky feeling!
And now for some specific questions:
- Am I correct in assuming that the spring 7219 should be replaced, since it's bowed and causes the mechanism to feel funky? Or is it supposed to be this way, for some reason?
- This piece is shown in the diagram but isn't named. Is it a "breather" port designed to avoid pressure differences between the inside and outside of the transmission? And in order to transfer it to the new top plate, do I just tap it out from the underside?
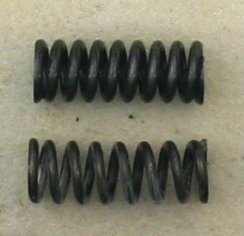
- Here are two of the shaft lock plunger springs (7234). Notice the way one of them isn't straight. I've noticed that sometimes curved springs rub against the cylinder walls where they live and cause a funky grinding sound or feeling when they operate. Should I replace this curved spring?
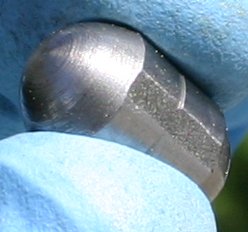
- Here's one of the expansion plugs. They got a little bent up during removal, and I can't imagine how they'll seal when I put them back in, although I haven't tried yet. Should I just replace these puppies, or do they look fine?
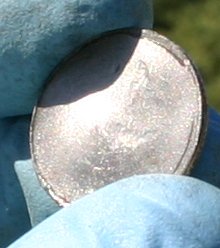
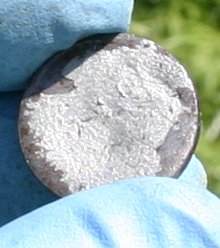
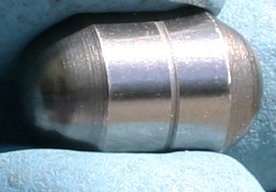
- This shaft lock plunger (7233) has significant ridges on two sides (directly opposite one another). It also has a bump on its head. I'm I correct in thinking that I should definitely replace this?
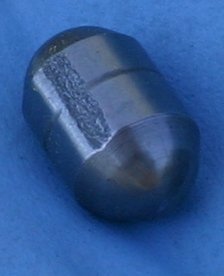
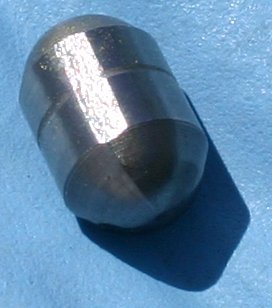
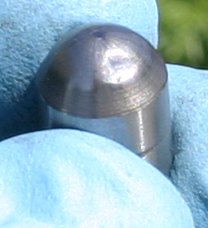
Here's the other, perfectly healthy looking shaft lock plunger, for comparison:
- Here's one of the shafts. You can see where the metal has worn away on the edges of the dips. I'm guessing that this is no big deal, and I shouldn't think about replacing these--but what do you think?
- The transmission man mentioned that my 1st/2nd fork still had a protective coating on its contact surfaces, and that he rarely sees a transmission that didn't wear this off. Is this truly an anomaly, or do these coatings often last a tremendously long time?
- Here's the spring seat (7228). You can see where the spring has significantly eaten away at its under side. I'm guessing that this isn't a cause for concern and it needn't be replaced--do you agree?
Robroy
-
70_F100
- Moderator
- Posts: 2999
- Joined: Mon Oct 22, 2007 11:23 am
- Location: North Carolina, Kernersville
Re: Making a T18 top end nice and tight: canes and top covers.
From your 12:15 PM post:
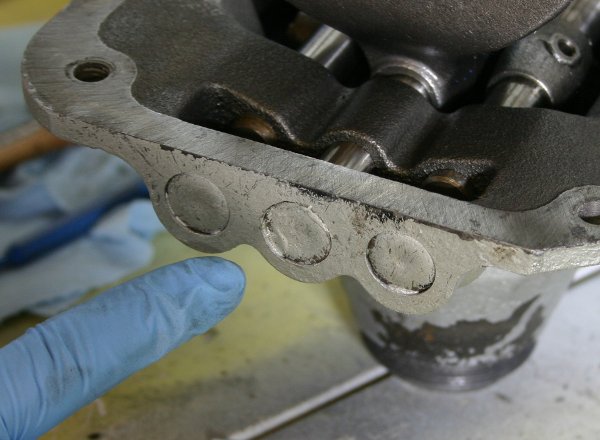
1) The small pin actuates the larger "slug" pins. When one of the rails is moved to "engaged" position, the "slug" pushes the small pin against the opposite "slug" which causes it to be locked out, preventing it from shifting. In neutral, the small pin and both "slugs" are sort of just "floating" or maybe "in limbo". The small pin goes in the 3-4 shift rail, and the "slugs" go in the large holes in the cover on each side of this rail. Together, the three pins form the "shift lock" mechanism.
2) yes
From your 4:56 PM post:
1) If you can locate one of those springs, do so. If you can't find one, don't worry about it. The only harm it will cause is to make shifting into reverse feel "funky".
2) Yes, it's a breather. Yes, tap it out from the bottom.
3) Those springs should be fine. Their only function is to hold tension on the detent ball that holds the shift rail in a given position. No way will you ever feel anything like "grinding" because of these springs.
4) Yes, replace all of those expansion plugs as I explained in an earlier post.
5) The ridges were in that plunger when it was made. Don't worry about it. You'll never know the difference. It's not what I would call a "moving" part, it's just part of the shift interlock.
6) Those shafts are fine. I've seen them with 10K-15K miles that looked just like that. The wear is slight, and it's smooth. Nothing to be gained here.
7) That coating, in most cases, lasts a long time. If it wears off, you get slop between the fork and the sliding clutch.
8 ) Spring seat should be okay, too.
One thing I'll mention. If you would be more comfortable replacing these parts, do so. They (I can't exactly tell you who "they" is, but I've seen them) offer a small parts kit for the cover that will contain all of these parts. If you can find one, buy it. It will contain a replacement for the bent spring mentioned in #1. My guess is that with as particular as you've been with this rebuild, and with the "uncertainty" I read into this post, you would be much more comfortable if you did so.
Looking GOOD so far. By the way, that wasn't so hard, was it????
Wise men talk because they have something to say; fools talk because they have to say something.--Plato
Why is it that there's seldom time to fix it right the first time, but there's always time to fix it right the second time???
That's not an oil leak That's SWEAT from all that HORSEPOWER!!
Why is it that there's seldom time to fix it right the first time, but there's always time to fix it right the second time???
That's not an oil leak
-
70_F100
- Moderator
- Posts: 2999
- Joined: Mon Oct 22, 2007 11:23 am
- Location: North Carolina, Kernersville
Re: Making a T18 top end nice and tight: canes and top covers.
Robroy, try this link for the small parts kit: http://www.gearwizzard.com/productdetai ... kuID_E_288
If that's not the top cover kit, maybe they can point you to a source.
International also used the T18, and they are good for being able to supply parts for older models.
If that's not the top cover kit, maybe they can point you to a source.
International also used the T18, and they are good for being able to supply parts for older models.
Wise men talk because they have something to say; fools talk because they have to say something.--Plato
Why is it that there's seldom time to fix it right the first time, but there's always time to fix it right the second time???
That's not an oil leak That's SWEAT from all that HORSEPOWER!!
Why is it that there's seldom time to fix it right the first time, but there's always time to fix it right the second time???
That's not an oil leak
-
Alvin in AZ
- Blue Oval Fan

- Posts: 583
- Joined: Thu Feb 19, 2009 3:50 pm
- Location: Gadsden Purchase
- Contact:
Re: Making a T18 top end nice and tight: canes and top covers.
So you aren't going to have a longer shift lever? :/
http://www.panix.com/~alvinj/file12/gearshift.jpg
Made an extention for mine back in ~'79 when I worked in a machine
shop. I wasn't trying to hide the seam, instead I was proud of it. ;)
My "new to me" knob from some old farm equipment...
http://www.panix.com/~alvinj/file12/gearshift1.jpg
It was given to me, that makes it better than a new bought one, see? ;)
Since it's tall the round knob is needed, the flat-oval knob doesn't feel
right held sideways. I'd give you an old original knob but R is right and
back on the ones I have from '75. I have -old- unmarked flat-oval knobs
too, but seems to me Salinas is farming country, so if you want an old
knob just ask around. ;)
I bent mine using heat. 2nd is as far back as I could go and still leave
elbow-room with the seat-back. Going between 1st and 2nd my hand
just clears the steering wheel. It's as close to me as I could get it. :)
I'm not short but never have liked putting the seat all the way to the
back like much shorter guys than me would do. I don't like reaching
for the steering wheel either. I put half inch spacers under the seat
that allows more leg room. It's my pickup. I get to modify it anyway
I want just to suit me, no matter how idiotic it feels to others. LOL :)
---------------------------
http://www.fordification.com/images/schematics/T18.jpg
See that spring #7227?
I added another spring to the inside of it, that has the opposite "twist".
Also set them in washers that have "side rails" all the way around
that keeps them lined up and adds spacers for even more pressure.
My cover etc are not sloppy, I just wanted it to "feel" tighter is all. :)
Seems like I still have some more of those odd-ball cupped washers.
---------------------------------------------------
Can't remember why I did this next idea. :(
But for some dangged reason I grooved the lever all the way around
using a file and put a retainer ring in that groove. Why I can't say LOL :)
I'll have to take it apart to re-figure that one out. LOL :)
The plan is to take pictures off all that stuff next time I take it apart.
I try not to leave -anything- I take apart unmodified!
I'm a tinkering fool. :)
Alvin in AZ is gettin' CRS tho... uhhhh... what does CRS mean again? :/
-
robroy
- 100% FORDified!
- Posts: 3768
- Joined: Sun Jul 06, 2008 4:36 pm
- Location: California, Salinas
Re: Making a T18 top end nice and tight: canes and top covers.
Hey 70_F100 and Alvin, thanks very much for replying!
If there are any interesting contrasts between the old and new parts, I'll post some good side-by-side photos of those.
It was actually pretty exciting to get my hands on all those internal transmission parts. I've been curious about the cause of all kinds of transmission symptoms in different cars for many years, and it's very fun to feel like I can do something about them now!
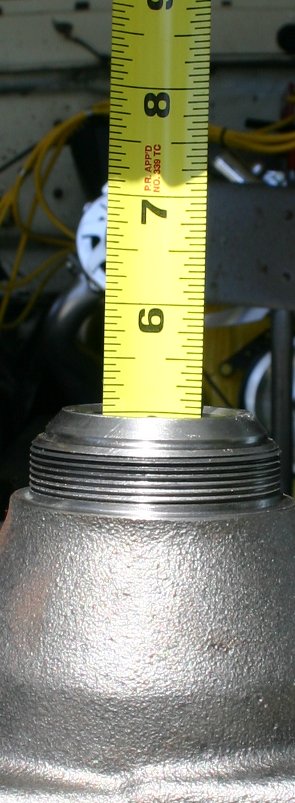
The new cane, with its 3 and 1/16" fork on the end (Novak said it was a 3 and 1/8" fork), is also pretty darn long! When stretched out all straight it's 30 and 1/2" long (starting at the base of the "ball").
I was planning on having it put on a lathe and reduced to the same length as the factory cane, but now that you mention the desirability of the longer cane, and after looking at your photos, I'll give it some thought first. I may even install the bench seat and sit in there, then experiment with the different cane lengths and see which works best.
Thanks very much 70_F100 and Alvin for the excellent replies!
Robroy
Thanks for this fantastic explanation--I'm close to getting it now! I'll eyeball it and use my imagination extensively during reassembly to see if my brain can grasp it 100%.70_F100 wrote:From your 12:15 PM post:
1) The small pin actuates the larger "slug" pins. When one of the rails is moved to "engaged" position, the "slug" pushes the small pin against the opposite "slug" which causes it to be locked out, preventing it from shifting. In neutral, the small pin and both "slugs" are sort of just "floating" or maybe "in limbo". The small pin goes in the 3-4 shift rail, and the "slugs" go in the large holes in the cover on each side of this rail. Together, the three pins form the "shift lock" mechanism.
Okay!70_F100 wrote:2) yes
Got it! I ordered a "Top plate rebuild kit" from Novak for $23 ($30 including shipping). According to the gentleman at Novak, it includes all the pins, springs and balls. We'll see!70_F100 wrote:From your 4:56 PM post:
1) If you can locate one of those springs, do so. If you can't find one, don't worry about it. The only harm it will cause is to make shifting into reverse feel "funky".
Fantastic, thanks! I'll give this a whirl.70_F100 wrote:]2) Yes, it's a breather. Yes, tap it out from the bottom.
I see what you mean! Yet now that I've ordered the top plate rebuild kit, if it has a nice straight spring I'll probably swap it out just on General Principles. But now that you point it out, I see that the bent spring syndrome only matters if the spring compression is changing significantly.70_F100 wrote:3) Those springs should be fine. Their only function is to hold tension on the detent ball that holds the shift rail in a given position. No way will you ever feel anything like "grinding" because of these springs.
OK, sorry I missed your first explanation! The kit I ordered today comes with new expansion plugs, thankfully.70_F100 wrote:4) Yes, replace all of those expansion plugs as I explained in an earlier post.
I see! Now that you point it out, the rough texture on the surface of the flat does seem indicative of a manufacturing defect, not abnormal wear. I suppose it would be a smooth or grooved surface if it were caused by wear.70_F100 wrote:5) The ridges were in that plunger when it was made. Don't worry about it. You'll never know the difference. It's not what I would call a "moving" part, it's just part of the shift interlock.
Great, thanks for letting me know!70_F100 wrote:6) Those shafts are fine. I've seen them with 10K-15K miles that looked just like that. The wear is slight, and it's smooth. Nothing to be gained here.
Interesting! It's also interesting that the new, replacement fork (3rd/4th) doesn't have that coating. I guess they made them both ways? Hopefully the new fork has perfect dimensions without the coating (so there's no slop there).70_F100 wrote:7) That coating, in most cases, lasts a long time. If it wears off, you get slop between the fork and the sliding clutch.
Perfect, thanks!70_F100 wrote:Spring seat should be okay, too.
I see your point! Now that I've ordered the kit, I'll probably do a comparison between each old part and its new counterpart. If the new one looks significantly prettier, I'll just pop in the new one instead of re-using the old ones. This makes sense considering that I'll have the parts, the kit was only $23, and I probably won't take this area apart again for decades, if ever!70_F100 wrote:One thing I'll mention. If you would be more comfortable replacing these parts, do so. They (I can't exactly tell you who "they" is, but I've seen them) offer a small parts kit for the cover that will contain all of these parts. If you can find one, buy it. It will contain a replacement for the bent spring mentioned in #1. My guess is that with as particular as you've been with this rebuild, and with the "uncertainty" I read into this post, you would be much more comfortable if you did so.
If there are any interesting contrasts between the old and new parts, I'll post some good side-by-side photos of those.
Thanks for your words of encouragement! And you're right--it wasn't so hard. But 90% of it not being hard was due to knowing that you were here with expert advice on each and every step--thank you very much!!!70_F100 wrote:Looking GOOD so far. By the way, that wasn't so hard, was it????
It was actually pretty exciting to get my hands on all those internal transmission parts. I've been curious about the cause of all kinds of transmission symptoms in different cars for many years, and it's very fun to feel like I can do something about them now!
Okay, thanks for this advice! Gear Wizzard does seem to have lots of parts that Novak doesn't. Yet you know, since Novak ships very quickly and is nearby me (they're in Utah while Gear Wizzard is in Philadelphia), and since the kit was only $23+shipping, I went with them. Things arrive very quickly when I order from them. For instance, the cane with the shorter fork on the end already arrived!70_F100 wrote:Robroy, try this link for the small parts kit: http://www.gearwizzard.com/productdetai ... kuID_E_288
If that's not the top cover kit, maybe they can point you to a source.
International also used the T18, and they are good for being able to supply parts for older models.
Hey Alvin! It's interesting to know that some folks actually prefer the longer cane!Alvin in AZ wrote:So you aren't going to have a longer shift lever? :/
http://www.panix.com/~alvinj/file12/gearshift.jpg
Made an extention for mine back in ~'79 when I worked in a machine
shop. I wasn't trying to hide the seam, instead I was proud of it.
The new cane, with its 3 and 1/16" fork on the end (Novak said it was a 3 and 1/8" fork), is also pretty darn long! When stretched out all straight it's 30 and 1/2" long (starting at the base of the "ball").
I was planning on having it put on a lathe and reduced to the same length as the factory cane, but now that you mention the desirability of the longer cane, and after looking at your photos, I'll give it some thought first. I may even install the bench seat and sit in there, then experiment with the different cane lengths and see which works best.
It most certainly does! That's a nice looking knob--I really like its simplicity.Alvin in AZ wrote:My "new to me" knob from some old farm equipment...
http://www.panix.com/~alvinj/file12/gearshift1.jpg
It was given to me, that makes it better than a new bought one, see?
Yes you're probably right! The machine shop I attend does 95% of its business with farmers. In fact, they make all kinds of custom ride-on farming equipment with engines, transmissions, and everything.Alvin in AZ wrote:Since it's tall the round knob is needed, the flat-oval knob doesn't feel
right held sideways. I'd give you an old original knob but R is right and
back on the ones I have from '75. I have -old- unmarked flat-oval knobs
too, but seems to me Salinas is farming country, so if you want an old
knob just ask around.
Sounds like a good, custom setup you have! That's how my transmission was with cane #2 installed. Going between granny (1st) and second, the shift ball nearly hit the steering wheel! I wasn't sure if I thought that was cool or not! I'd almost have to actually drive it for a while with different canes to choose one.Alvin in AZ wrote:I bent mine using heat. 2nd is as far back as I could go and still leave
elbow-room with the seat-back. Going between 1st and 2nd my hand
just clears the steering wheel. It's as close to me as I could get it.
I'm not short but never have liked putting the seat all the way to the
back like much shorter guys than me would do. I don't like reaching
for the steering wheel either. I put half inch spacers under the seat
that allows more leg room. It's my pickup. I get to modify it anyway
I want just to suit me, no matter how idiotic it feels to others. LOL
Interesting! This is a good potential modification. I actually had a similar thought before taking it apart--I was wondering if the factory spring in there had gotten weak over the decades, and wondering how different it would be with a little more pressure under the cap.Alvin in AZ wrote:http://www.fordification.com/images/schematics/T18.jpg
See that spring #7227?
I added another spring to the inside of it, that has the opposite "twist".
Also set them in washers that have "side rails" all the way around
that keeps them lined up and adds spacers for even more pressure.
My cover etc are not sloppy, I just wanted it to "feel" tighter is all.
Seems like I still have some more of those odd-ball cupped washers.
That's interesting! I'd LOVE to see photos of your modifications next time you rip it apart. There's a shortage of good photos of these types of things out there!Alvin in AZ wrote:Can't remember why I did this next idea.
But for some dangged reason I grooved the lever all the way around
using a file and put a retainer ring in that groove. Why I can't say LOL
I'll have to take it apart to re-figure that one out. LOL
The plan is to take pictures off all that stuff next time I take it apart.
I try not to leave -anything- I take apart unmodified!
I'm a tinkering fool.
Thanks very much 70_F100 and Alvin for the excellent replies!
Robroy
-
70_F100
- Moderator
- Posts: 2999
- Joined: Mon Oct 22, 2007 11:23 am
- Location: North Carolina, Kernersville
Re: Making a T18 top end nice and tight: canes and top covers.
Adding additional pressure to the 7227 spring will cause premature wear to the ball socket in the transmission cover, then you'll have the same thing that Robroy had; that is, a worn-out top cover.
The shift lever and ball are made of steel, and the cover is made of cast iron. No bearing in that area, so the increased pressure on top of the ball will create additional friction on the bottom side, which the cover is not designed to handle. Couple that with the fact that neither piece is machined to a really smooth finish (like a cylinder), and you're looking for trouble.
It might feel good for a long time, because of the extra pressure, but that's not the right way to get the "feel" right.
Wise men talk because they have something to say; fools talk because they have to say something.--Plato
Why is it that there's seldom time to fix it right the first time, but there's always time to fix it right the second time???
That's not an oil leak That's SWEAT from all that HORSEPOWER!!
Why is it that there's seldom time to fix it right the first time, but there's always time to fix it right the second time???
That's not an oil leak
-
Alvin in AZ
- Blue Oval Fan
- Posts: 583
- Joined: Thu Feb 19, 2009 3:50 pm
- Location: Gadsden Purchase
- Contact:
Re: Making a T18 top end nice and tight: canes and top covers.
So then, what is the "right way"? :)70_F100 wrote: Adding additional pressure to the 7227 spring will cause premature wear to the ball socket in the
transmission cover, then you'll have the same thing that Robroy had; that is, a worn-out top cover.
The shift lever and ball are made of steel, and the cover is made of cast iron. No bearing in that
area, so the increased pressure on top of the ball will create additional friction on the bottom side,
which the cover is not designed to handle. Couple that with the fact that neither piece is machined
to a really smooth finish (like a cylinder), and you're looking for trouble.
It might feel good for a long time, because of the extra pressure, but that's not the right way to
get the "feel" right.
Alvin in AZ
ps- 70, in theory all what you said sounds right! :)
In practice, in my one measly example, it hasn't worked out that way tho. ;)
I've had it apart a few times since I added the spring and hardware and saw no real wear.
The whole sucker is packed with grease, which is something I didn't mention.
Packing it full of wheel bearing grease maybe make the difference? {shrug}
In Feb 2010 I'll have had the pickup 35 years, it out lasted the wife, it has held up better. LOL :)
I'll make a point of taking it apart again soon and examining it for wear and take some pictures.
You got me spooked a little. ;)
pps- But I'm serious about wanting to hear your ideas on the "right way".
Last edited by Alvin in AZ on Fri Sep 25, 2009 7:32 am, edited 1 time in total.
-
Alvin in AZ
- Blue Oval Fan
- Posts: 583
- Joined: Thu Feb 19, 2009 3:50 pm
- Location: Gadsden Purchase
- Contact:
Re: Making a T18 top end nice and tight: canes and top covers.
Butthead in AZ wrote: I bent mine using heat. 2nd is as far back as I could go and still leave
elbow-room with the seat-back. Going between 1st and 2nd my hand
just clears the steering wheel. It's as close to me as I could get it. :)
Cool. :) I couldn't ask for anything more. :) It's easy to get to and remove,robroy wrote: ...may even install the bench seat and sit in there, then experiment
with the different cane lengths and see which works best.
...
That's how my transmission was with cane #2 installed. Going between
granny (1st) and second, the shift ball nearly hit the steering wheel!
I wasn't sure if I thought that was cool or not! I'd almost have to actually
drive it for a while with different canes to choose one.
Robroy
if the boot isn't screwed down. Look at my pictures, the sucker's in 1st and
shown from two different angles.
I screwed my boot down on top of the rubber mat "Chevy style" (later I
replaced it with carpet). Originally is wasn't, the boot was under the fiber
mat even. In the boot's lowest "crease" is where the fiber mat and rubber
mat's edges were hidden when it was new. But, the edges weren't all that
well hidden and looked like crap, IMO. ;) YMMV?
I put ~$320 worth of Super DynaMat in my cab. I glued it down to everything
I could find. LOL :) I'd use it up and go buy a couple more rolls. :)
http://www.panix.com/~alvinj/file12/F100floor.jpg ('75 F100 parts truck)
On my '75 F150 I filled all the grooves in the floor with Bondo, after it
hardened, used a brush on a 4inch hand grinder to smooth it out real nice. :)
Allowed the DynaMat to lay down nice and made the whole works even more
"quiet" (seemed like anyway;).
My '75 F150's floor wasn't rusty like that at all! :) That '75 F100's floor is rusty
just like that on both sides from water coming in under the boot because(?)
it was still screwed down "Ford Style". It still had the original foam rubber
"donut" too, which in my opinion, was always too small and thin. When I made
a new one in the early 80's my homemade one is a big rectangular piece and
seals out the weather like it means business. ;)
Alvin in AZ
-
robroy
- 100% FORDified!
- Posts: 3768
- Joined: Sun Jul 06, 2008 4:36 pm
- Location: California, Salinas
Re: Making a T18 top end nice and tight: canes and top covers.
Hi Alvin and 70_F100, thanks for replying!
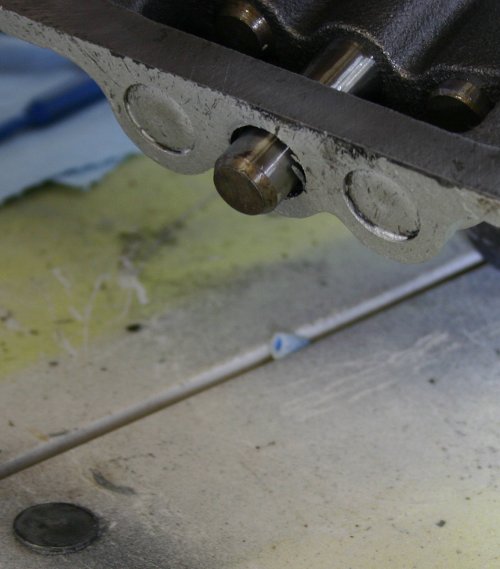
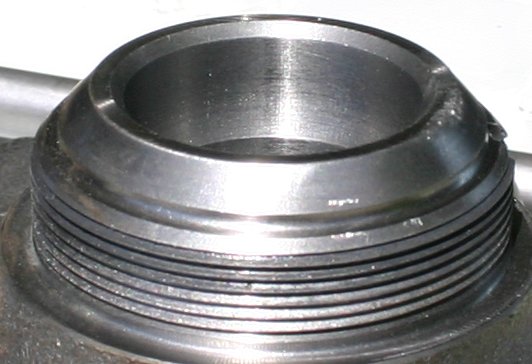
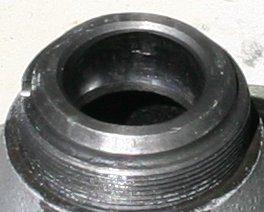
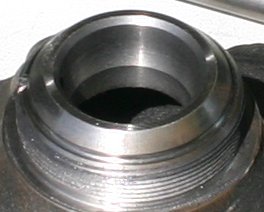
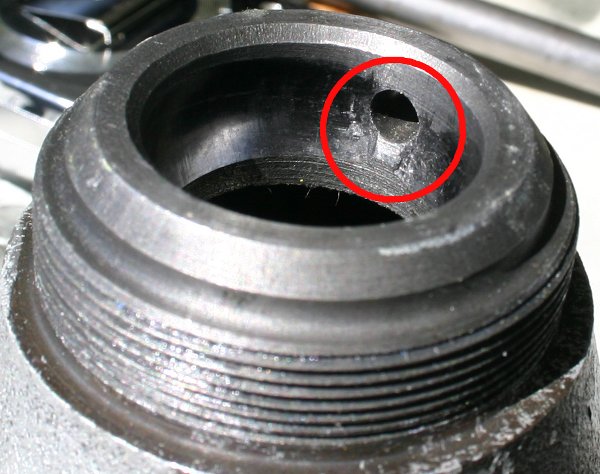
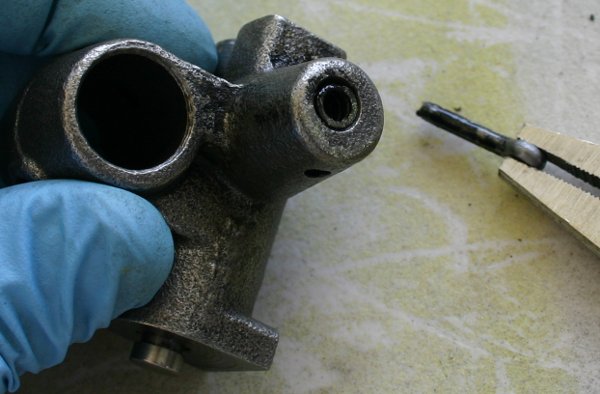
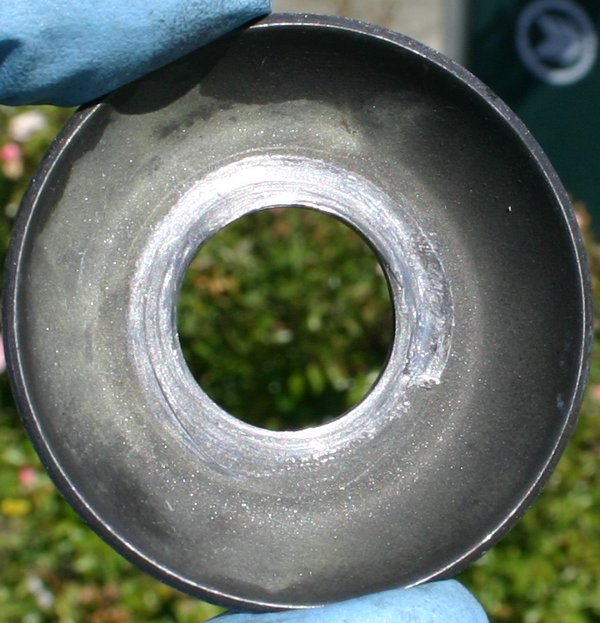
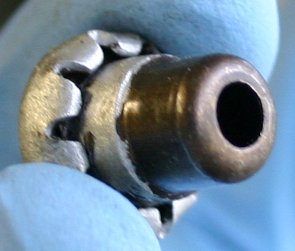
I punched the breather out:
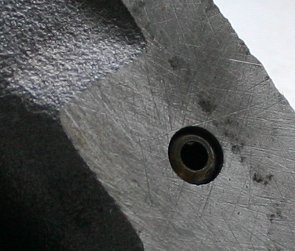
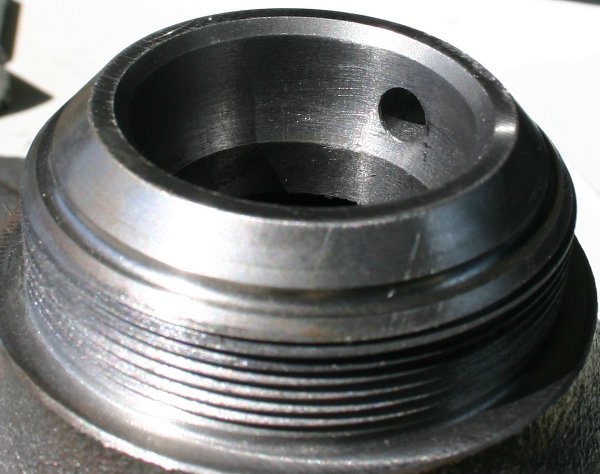
Then, while staring at it, I finally realized why my original top plate had the extra support on the reverse shaft!
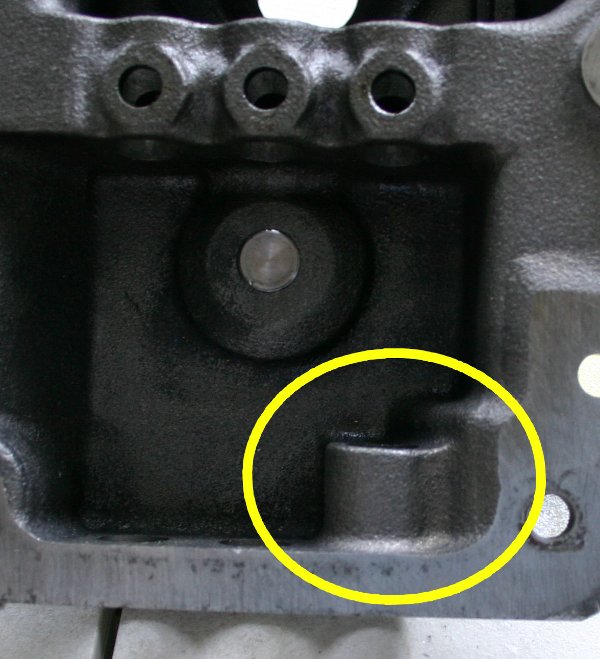
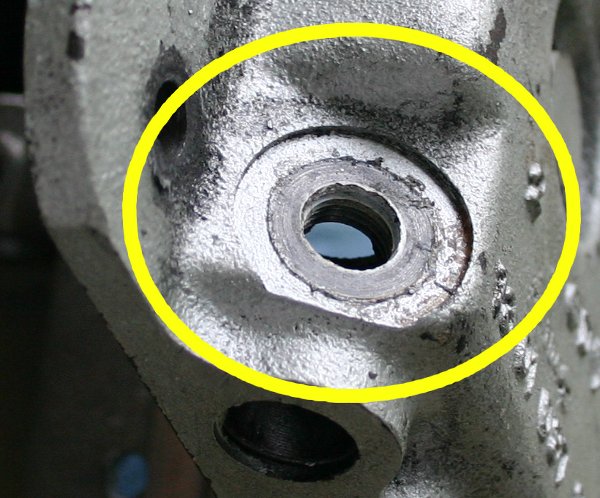
That support's there to keep the shaft going straight when it hits the ball on the backup light switch! After realizing this, I was quite surprised, and looked the new top plate over--the new top plate seems to have no provision for a backup light switch whatsoever!
I thought it was really funny that I'd spend that much time comparing the plates and fail to notice this significant difference between the two.
Unless there's an easy way to adapt a backup light switch to this plate, which I doubt, I'll be happy to accept having manually operated backup lights. And since I'd planned on installing some extra fancy backup lights anyways, this doesn't bother me. It sounds more exciting! I like working switches.
Thanks very much for the superb guidance!
Robroy
I punched the breather out:
Then, while staring at it, I finally realized why my original top plate had the extra support on the reverse shaft!
That support's there to keep the shaft going straight when it hits the ball on the backup light switch! After realizing this, I was quite surprised, and looked the new top plate over--the new top plate seems to have no provision for a backup light switch whatsoever!
I thought it was really funny that I'd spend that much time comparing the plates and fail to notice this significant difference between the two.
Unless there's an easy way to adapt a backup light switch to this plate, which I doubt, I'll be happy to accept having manually operated backup lights. And since I'd planned on installing some extra fancy backup lights anyways, this doesn't bother me. It sounds more exciting! I like working switches.
Thanks very much for the superb guidance!
Robroy
-
fordman
- 100% FORDified!
- Posts: 22329
- Joined: Sun Aug 28, 2005 8:17 pm
- Location: Kansas, Ottawa
- Contact:
Re: Making a T18 top end nice and tight: canes and top covers.
put as beeper on it to backup. that would be unique. or a bell on the back tire. just like some of the older big truck had.